🏢 Advertisers
📍 Advertisers >> New Advertiser / Products / EventsYou are allowed to blacklist/whitelist sources at advertiser level. If you have the affiliates that are known from advertisers/previous sources performance/reports, you can control the sources to avoid chargeback at the end of the month.
Advertisers > Affiliate Blacklist/Whitelist
Please be aware that Blacklist and Whitelist are the other way around, you can only blacklist or whitelist at a time for each source.

Blacklist Affiliates/Sub Affiliates
1.Go to your advertiser page > Affiliate Blacklist/Whitelist
2.Choose Type ‘Blacklist’
3.Decide which offers of this advertiser that you would like to apply the Blacklist rule
4.Add Affiliate to blacklist
5.Choose the redirect type for the blacklisted affiliate
6.Click ‘Add’, your blacklist rule will be applied and shown at the history table
below, where you can also delete the blacklist rule
Whitelist Affiliates/Sub Affiliates
1.Go to your advertiser page > Affiliate Blacklist/Whitelist
2.Choose Type ‘Whitelist’
3.Decide which offers of this advertiser that you would like to apply the Whitelist rule
4.Choose the redirect type for the non-whitelisted affiliates and add whitelist affiliates which can run this advertiser’s offers
5.Click on ‘Add’ to apply the whitelist rule
Sub Affiliate Management
Advertiser managers can also control sub affiliates for some sensitive offers.
Advertisers > Sub Affiliates Management
Here you have three options to control sub affiliates.
Settings
You can control affiliates/sub affiliates by setting conversion cap and throttle.
1.Go to your advertiser page > Sub Affiliates Management
2.Enter Offers if require
3.Enter Affiliate and its Sub Affiliates to be set
4.Check Daily Conversion Cap/Sub Affiliate Throttle if you need to limit conversion cap for the specific sub affiliates
5.Click ‘Add’ when you finish the settings
Sub Affiliate Blacklist/Whitelist
Similar to Affiliate Blacklist/Whitelist, you can add sub affiliates/sub affiliate group that will be blocked/whitelisted in the box and choose the reason in the drag down of Reason. The reason and Additional Notes (if any) will be sent to related Affiliates by email.
Here is where the whole flow starts. This tutorial will guide you step by step to create a new customized advertiser entry as one of the tracking units and stats metrics. You will be able to find a detailed instruction of how to create and manage all your Advertisers.
Before you create a new entry of Advertiser, what you will need to do is collecting these mandatory information of your partner:
- Advertiser Official Address (details, City, State, Country)
- An email that Advertiser would like to use as their username on our platform
- Payment types and payment terms
- Currency they would like to use for billing
When you gather all the information, you can start the creation of new Advertiser entry by following below steps:
1. Go to Advertisers > New Advertiser
2. Enter Advertiser basic info and upload Assets (if needed):
Please fill in the fields with * for advertiser's basic details, which include:
- Name
- Status
- Insertion Order
- Terms & Conditions
- Address
You can learn more about the explanation of each section by hovering on the title icon.
3. Enter advertiser's Billing Info, including:
Invoice System
Please choose the corresponding system, see [related articles - invoices].
Billing Cycle
NOTE: please notice that once billing cycle is set, change needs to be careful. We suggest to conduct invoice changes at the time of the start/end of a cycle, which will be neat and tidy for finance team to manage invoices.
Payment Type
NOTE: currently we accept two payment types, either Wire/ACH or PayPal. This is an informational field which will not effect the live business.
Payment Terms
NOTE: this is an informational field for managers to better categorize the advertisers. You can select the payment terms from NET3 to NET60. It is also an unchangeable field. If you need to change payment term, please raise a request to internal-support@trackrevenue.com.
Currency Used
NOTE: YD platform has integrated with rate exchange endpoint to show the approximate real-time rate for user convenience.
4. Enter Main Contact
Here, we suggest you to fill in the contact of who you work with, so he/she may login to your advertiser panel and receive the invitation email when you create the advertiser account for him/her.
The email here will be the user name of their login.
5. Choose Advertiser Manager, the person who will be taking care of this advertiser
This will effect the accessibility of stats and related co-workers. Please consider the owner of the account.
6. Save the entry
By clicking on the Save button, create a new advertiser entry. However, for business convenience, you may also need to conduct below settings to customize your advertiser settings. Please do not hesitate to go ahead!
After creating the advertiser entry, the page will be refreshed and you will be able to see the whole advertiser setup page with more sections for customized and advanced setups.
Offers
You can continue to create offers for this advertiser as long as you have the offer details.
Find 'Create Offer' button on the top right and you will be redirected to [New Offer] page.
Once you got offers created under this advertiser, you will be able to see all the offers that created on this 'Offers' sub page.
Filters
- You can set up filter by time of the offer created and country(which is set at offer level) at Filters.
- You can also export the filter result by clicking on Export Data. You will see a notification and the CSV containing all the selected offers details could be downloaded from the hyperlink under 'Offers CSV Export Succeeded' in the green notice.
Actions
You can execute two bulk commands at Actions:
- Bulk create campaigns
Select multiple offers and enter multiple affiliate IDs or keyword of affiliate name that you would like to bulk create campaigns at the box besides 'Create Campaigns' to create multiple campaigns at the same time.
- Bulk update offers
Managers can make some bulk changes from this sub page. You should be able to see below fields are available in the drop down:
- Status, offer status;
- Application Process, how would affiliates be able to apply/get this offer;
- Auto-Approve Campaign, once enable, the campaigns of the selected offers will be automatically approved and related affiliates will see the campaigns with default offer set up directly.
- Select the new value for these fields and you will have the offers bulk updated.
Affiliate Blacklist/Whitelist
It is possible to set up blacklist/whitelist on advertiser level. As long as you have related affiliates set up in the system, you can decide if you would like to allow their traffic to go to your advertiser's offer.
Affiliate Blacklist
As named, here you can redirect affiliates that set in the system by three different types:
Redirect Monetizer - redirect affiliate traffic to Redirect Monetizer that set in Settings > Redirect Monetizer
Redirect to 404 - affiliate will be redirected to 404
Offer Redirects - affiliate will be redirected to selected offers
Affiliate Whitelist
Whitelist is the other way around against blacklist, which means once it has been set, only the selected affiliates are allowed to run the advertiser's offer and other traffic will be all blocked.
Sub Affiliates Management
YD platform allows Advertiser Managers to manage sub affiliates by entering the known values. Advertiser Managers can block the known performance sub affiliates from this sub page.
Offer Link Parameters
On the sub page of 'Offer Link Parameters', you can customize S parameters with what advertiser required and enter pre filled parameters for all offers under this advertiser's account.
Event tracking is used when the Advertiser would like to pass additional events other than the default conversion, no matter the events occur either before or after. Usual seen events might include registrations, sales, retention, first time purchase, etc.. This section will provide you the guide of applying multiple event tracking with your Advertiser.
On YD platform, you have the option to create a global event that can be applied to multiple offers of the same advertiser. The default conversion event would be created once the new advertiser gets created. Global event is unchangeable once created and it does not accept duplicate conversion (which means it only accept converting event once from the same click ID).
How to add an Event
Following steps below and start tracking multiple events on the platform.
Step.1 Add an event on Advertiser page
Go to Advertisers, navigate to corresponding advertiser entry and scroll down to Event section. Click on Add Conversion Event and you will see a new block added below
Step.2 Enter the details of events in the required fields, and check the boxes to set the event property
Fields Note
Name - Event name, which will be used internally for users to define the event
API ID - An optional field to match against conversion event that passed from Advertiser when using API, which should be strictly matching what the Advertiser will pass through the API. Only alphanumeric characters, underscore and hyphen are allowed. No spaces.
Is Converting Event - If checked, the event set will be taken as a converting event. Its conversions and revenue brought will be counted into the stats of OCE (other converting events). If not, the event will be set as NCE (non converting events) which will not be calculated to revenue.
Price Format - CPA or Revshare
Received & Payout - same as offer setup
Allow Duplicate - By default, YD platform does not allow multiple conversions for single click. If checked, multiple conversions for single click will be admitted for this event.
Suppress All Postbacks - If checked, all conversions of this event will be held and will not be passing to the affiliates.
Event Initialization Option - You can decide if you would like to make this event active on existing offers or not. By default, the new event will only effect to the offers created afterwards. If you would like to apply the event to current offers, pick either 'Yes, Active Offers' or 'Yes, All Offers'.
Step.3 Scroll down, click on 'Save' button
If your event setup needs to be specified on offer level, you can access the sub page 'Events' on offer edit page.
Step.4 Synchronize the event postback url with your Advertiser
Copy that Postback URL and provide it to your Advertiser so they can fire those events into YD.
Event Data & Stats
After the traffic starts, you may need to monitor your event data and statistics in multiple time range and dimensions. You have several options to have your event tracking results.
#1 Stats > Column Control > Event Summary
#2 Precision Stats > Group By 'Event' > Filters
#3 Reports > Event Column Report
#4 Reports > Event Pivot Report
1 Stats > Column Control > Event Summary
To have an overview, you can have all event performances on Stats. On the Stats page, you will see 'DE' and 'NCE' by default. If you need to check 'OCE', please go to first column's header and select 'OCE' from the column control menu.
You can select the Advertiser/Affiliate/Offer/Campaign and pivot to see associated events performances.
2 Precision Stats > Group By 'Event' > Filters
You will have more detailed information on Precision Stats.
The option of 'Event' is lying under the Group By section, what you need to do is to select the 'Event' and add your filters (if needed) on the right side. By querying these stats, you will see all events' performance as detailed as you want.
3 Reports > Event Column Report
4 Reports > Event Pivot Report
Usually at the beginning of the partnership, we may need to confirm the advertiser is able to pass conversions to us correctly before jumping into real business. Also, tokens are important. You may want to conduct a virtual test between YD and your advertisers' tracking platform to make sure that you are able to receive the lead.
Step.1 Send our postback url to your advertiser
To start tracking offers, you need to send your postback url to your Advertisers. You can find your postback url at Help center (it's hiding in the question mark beside 'Log Out').
Example Postback url:
https://cname.domain.com/t/pb?leadid=#subid#
Step.2 Use the offer link shared by your advertiser to create a new offer
Fill in mandatory information to create an offer entry for test. Do not worry about the settings now, you can go back and change those later.
Step.3 Generate a test offer link
Stay at 'Edit Offer' page, find 'Test Offer URL (Not Real Traffic)' and generate a test link.
Step.4 Share the test link with Advertiser and ask for a virtual test
Send it to your advertiser and ask your advertiser to fire a conversion from their platform
Step.5 Check conversion log or on stats and see if you have received the conversion
Tips: You can search the conversion at 'Click/Conv Lookup' by the campaign code after the 'id' token.
🤝 Affiliates
📍 Affiliates >> New Affiliate / Edit AffiliateAffiliate is a unit of publisher that you can set up account for. Affiliate account should be associated to publisher's endpoint.
Similar to create a new Advertiser, you need to confirm with your Affiliate/Publisher about their business and billing details for business convenience.
Following below steps to get your first affiliate account created.
1 Go to Affiliates > New Affiliate
2 Enter Affiliate Information
On the new affiliate edit page, enter Affiliate Information, including:
Affiliate:
- Name
- Status
- If the status is “Pending”, after created the affiliate you will need to approve it manually from the affiliates list.
Manager:
- Affiliate Manager
- Only this manager will be able to see all the details of this affiliate.
Address:
- Primary Address
- City
- State
- Country
- YD platform has tied most often-used countries with their VAT% policy, for Netherland publishers, their VAT will be fixed (21%) and will be added to the invoice automatically.
Main Contact:
- First Name
- Last Name
- The email here will be the user name of their login, which recommended to be the email that your partner is using to receive the notification emails.
- Password
- You can set up a password for your affiliate. They can change that afterwards.
Billing and Payment:
This section directly effects the self billing invoices, please try to fill in details as accurate as you can so that it will be applied to the invoice.
As seen, there are several fields with default value [TBD]. These fields are all about your affiliate's invoicing details which will be added on the self billing invoices.
You don't have to fill out these fields when you create a new affiliate. However, these fields are mandatory for billing details verification, which needs to be filled with affiliate's invoicing info before it's passed to finance department.
- Billing Type
- Please choose Standard Billing as net payment.
- Billing Cycle
- Select the billing cycle to set up your affiliate's self billing range. At the end of the cycle, you will have an invoice generated automatically for this affiliate.
- Note: Please notice the time range of Bi-weekly and Bi-monthly.
- Bi-Weekly: calculate affiliate's number twice a week. The end day of the cycle is each Wednesday and each Sunday.
- Bi-Monthly: calculate affiliate's number twice a month. The end date of the cycle is each 15th and 30th/31st.
- Payment Type
- This field associates to the finance system. Once chosen, the finance department will send the payment to your affiliate via the selected type.
Wire
- Bank Name - Your Affiliate's bank name for wire
- Account Number - Your Affiliate's bank account number
- SWIFT Code - SWIFT code of your affiliate's bank. The SWIFT Bank Identification Code is an internationally-recognized system of codes for identifying banks. The code is 8-11 alphanumeric characters long and contains information identifying the country, bank, location, and branch.
- Routing No./ABA - The ABA Routing number is also sometimes called the Routing Transit Number (RTN). It is used to identify banks in the United States and is required along with the account number to perform a transfer. The ABA Routing number is 9 digits long and composed of numbers only.
Payoneer/Paypal
- If you are sending payments to your affiliates through Payoneer or Paypal, please enter their account email.
Capitalist Payment
Please enter Capitalist Account Beneficiary if you work with your affiliates with crypto currency.
- Finance Email - optional, if set, all the invoices generated will be automatically sent to the finance email.
- Add VAT% to invoice - please check the box to add VAT% onto your affiliate's invoice. 21% of VAT will be added automatically to Netherland's affiliates once checked.
- VAT/SSN/Tax ID - the tax ID of your affiliate's
- Finance Creditor Number - the creditor number of your finance staff
- Payment Reference - the person who associates to the payment
- Currency - Choose USD or EUR for the affiliate invoicing.
3 Save the Basic Information and Continue to More Detailed Setup
After entering all the mandatory fields, you can now click on 'Save' to create a new Affiliate entry. You will see a small window telling you that your affiliate has been created successfully.
For more advanced affiliate setup, please continue on the page that you are redirected to.
You must need more customized setup to better manage your affiliates without keeping eyes on it every second. There are more settings that may help 'release your hands' and specify the details on your affiliate.
Sub Pages on Affiliate Setting
Affiliate Campaigns
This is a page for the campaigns associating to the affiliate, where you can see all the historic campaigns created and their details.
You can filter and export the campaign details by using the Filters on top.
Quality
You can use Quality feature to hold the conversions and not postback to your affiliates for those conversions which do not meet your CTIT criteria.
Token Management
Customizing affiliate tokens is possible. You can enter your affiliate's token/parameters that required on this sub page.
Affiliate Blacklist/Whitelist
Blacklisting/whitelisting for specific campaigns will help you to strengthen the management of your affiliate.
Sub Affiliate Management
Sub affiliate management is a useful feature for network business, which allows you to take advanced and instant action to respond the fraudulent or bad performance traffic. You should be able to block/whitelist/throttle sub affiliates accordingly.
Available Offers
You can see all the offers that are available to the affiliate on this sub page. Meanwhile, you can create campaigns in bulk.
S Token Parameters
The S tokens here are for the campaign url assigning to the affiliate. Once set, the set tokens will be pre-filled on the campaigns assigned to the affiliate, and will be automatically attached to campaign urls.
Publisher Finance Details
For finance convenience, this sub page is designed for the scenario of the affiliate's finance details missing when creating the affiliate. Finance manager and Affiliate Manager will work together to fill out all the financial details for billing verification. You can update the latest billing information of your affiliates anytime and new verification request would be sent to your finance.
When integrating with partners in S2S, we always suggest you to do a test before you jump into real business. On Affiliate side, Affiliate Managers will always be asked to fire a test conversion.
Here, you can now test Affiliate's Postback by entering the test link in the box and see all the test link redirect details. By submitting the test link, you will get all the information about the campaign link and the test conversion will be fired directly.
If you get the result of [200], then it means the test succeed and your affiliate should receice the test conversion.
NOTE: YD platform will identify the test link that not redirecting passing through YD campaign link as invalid link and reject the test. Therefore, please confirm with your affiliates that the redirection of test link works correctly and the test link will land on the test campaign url (where YD captures the click and generates the click id to be fired).
🎯 Offers
📍 Offers >> New Offer / Edit Offer DetailsOn YD, when you have multiple offers to update, you don’t need to go to each offer and do the edit. We have a bulk update feature which you are able to have multiple offers updated at a time.
1.Go to ‘Log’
2.Choose Bulk Update by CSV
3.Choose ‘Edit Offer’ tab
4.Find  button and get the CSV template
5.Fill in the CSV template according to your need, save the CSV
6.Go back to this page, now you can upload your filled CSV via

7.Select configurations of:
- Time to Process
‘Immediately’ - Your edit will take place effective immediately.
‘Set Time’ - Your edit will take place at the time that you set.
- Reset Campaign Payout
If enabled, custom payouts of all campaigns associated to offers in the CSV will be cleaned, campaigns will use offer’s payout instead.
- Disable Campaign Cap
If enabled, cap of campaigns associated to offers in the CSV will be deleted.
- Send Email Notification
If enabled, you can send email notification to related Affiliates or Advertisers once your update is done.
- Email Notification
Choose the template that you would like to send to. (Please remember to create one if you do not have template for bulk offer update.
- Recipients
Choose who you would like to send email to.
8.Submit your settings
Offer is the basic tracking unit of advertiser. On YD platform, creating a new offer is easy and straightforward. Similar to other platforms, you need to create an Advertiser before you create an offer. By following below steps, you can have any offer created with the least set up.
You have several paths to get you to create a new offer:
#1 Offers > New Offer
#2 Advertisers > Advertiser Detail page > Create Offer
#3 Logs > Bulk Update by CSV > Create Offers
#1 Offers > New Offer
1 Go to Offers
2 Click on ‘New Offer’ button
3 Fill in the mandatory fields with * mark
These fields are the basic setup for each offer. Please get them ready before you create an offer.
* Offer
Name
Please enter the offer name with the format you've set.
Status
Here you can decide what status that this offer will be: active, pending, inactive or etc.
Application Process
Choose who can see your offers and how you would like your offer to be applied.
- Public - All the affiliates can see this offer at the panel and a campaign will be automatically generated for each affiliate. They can automatically get the campaign information via API.
- Private - Affiliates will not see this offer at the panel. Only when an Affiliate Manager gets the approval from Advertiser Manager can he get the campaign information.
Vertical & Sub Vertical
Choose the category for the offer for better future look up and management.
Tracking Domain
Please choose the domain that you would like to use for tracking. It is changeable on Campaign level. For the available domains, please check [Domain].
Time Zone
Please choose the correct time zone for your offers, it relates to the time of cap resetting, statistic calculation, invoice items etc..
* Payout
Price Format
Choose either CPA or RevShare, fill in the relevant information for your offer.
Received
Enter the offer payout you got from the advertiser.
Default Payout
This will be the default payout for this offer to affiliates. If Affiliate Manager doesn't change the payout in the campaign, this payout will be shown to affiliates directly.
* Action
Offer Link
This is the most important part of the offer. It decides whether the ad will be tracked correctly. One offer may connect to multiple campaigns.
Apply Advertiser Parameters
You will see the yellow button under the field of 'Offer Link'.
If you have your Advertiser Parameters set at Advertisers settings, the parameters will be automatically added to the offer link once you click on 'Apply Advertiser Parameters'.
Advertiser Name
Choose related Advertiser for the offer.
* Tag
Countries
Choose the tag for better categorization and management.
4 Scroll down and click on 'Save' button
After finishing all these settings, click on ‘Save’ and you have your new offer created!
Then, you will be redirected to a new page with more settings.
Be patient, these advanced settings will help you better manage and track the offer.
#2 Advertisers > Advertiser Detail page > Create Offer
This way is similar to #1 but you just do not need to select Advertiser.
#3 Logs > Bulk Update by CSV > Create Offers
If you have multiple offer details in patch, you can always try to create offers in bulk to ease op burden.
1 Go to Logs > Bulk Update by CSV
2 Click on 'Create Offers'
3 Download the template and fill the offer details in the CSV, save
4 Upload the CSV file by clicking on 'Upload Offers'
5 Set Time to Process and related setups
6 Submit the request
You should be able to see the process details and result at 'Status'. If the upload succeeds, you should receive the notification window on top-right.
We would definitely happy to help you have your offers customized and your offer details enriched to better manage your tracking. Continue and see what else you can set other than price and tracking url.
Yes, we know, it is not flexible to only have the basic offer setup. With the advanced offer settings below, you should be able to tailor your offers and find the best solution to not only maximize your offer performance but also your work efficiency.
On the offer page, you are able to set cap limit for default conversion event. Then how about other events?
The answer is on sub page Events.
You can set independent caps for each offer event other than default conversion event on YD platform. Event caps can work individually or in conjunction with other caps. If multiple caps are specified for the same interval, the lower value is prioritized.
1 Go to Offers > Events
2 Enable Offer Event Caps
3 Decide if your cap setting is 'Paid Conversion Only'. If this box is checked, then the cap settings will be overwritten and the limit will be on paid conversions.
4 By default, all the events cap will follow the original setup when the event created. You can just enable the event that you would like to specify and disable the ones that do not need to be updated.
Set up Event Cap
When you set up the event on Advertiser level, you can apply further setup to control event tracking on the offer level.
1.Go to the offer page that you would like to set event cap
2.Enable the Offer Event Caps
3.If you check the 'Paid Conversion Only' box, then the cap applied here would be conducted as the number that after throttled, what the affiliates will receive is the exact number here; if the box is not checked, then the event limit will strictly work as it is set on the offer level.
Scheduled Offer Changes
Change offer status manually could be inconvenient and easy to forget. On YD platform, you can pre set the offer changes for offer status/received/payout/cap/throttle.
Available Fields to schedule
Status
By default, we believe you would like to keep the same offer status. But for sure that you can schedule changes for offer status by enabling the first button.
Throttle
Check the box and enter new throttle percentage if you need any changes. Also the type. You can see the current throttle details under the fields.
Price & Payout
Similar to throttle, please check the fields and enter new values that you need.
Cap
You can schedule cap change by enabling it. Same setup process as offer cap.
Event
Scheduling changes for OCE's received and payout is also possible. Check the box and enter the new values that you need changes.
Time to Set
You can decide if you would like the changes to happen immediately or at specific time. Once you set, the schedule will apply on the exact time.
Email Notifications
If you need to notify stakeholders of the offer changes, please enable Email Notification and choose the associated email template and recipients. Email will be sent out immediately once you add
Fraud
Here are the settings for preventing quick conversion fraud. CTIT is the key evaluation to indicate the fraud traffic. Usually the time between first click and the conversion event happen should not exceed 30 seconds. Hence when you check the box of 'Quick Conversion Detection', you will see 30 as default. However, you can decide if your own standard of Quick Conversion. YD set up the time range from 0 to 120 seconds for users to identify the quick conversions.
You can also choose whether you would like to throttle the quick conversions detected by enabling the 'Fraud Real Time Throttling'. If enabled, the conversions that meet system fraud criteria will be throttle real time.
S2S
You can provide postback url for specific event to the advertiser when it is needed.
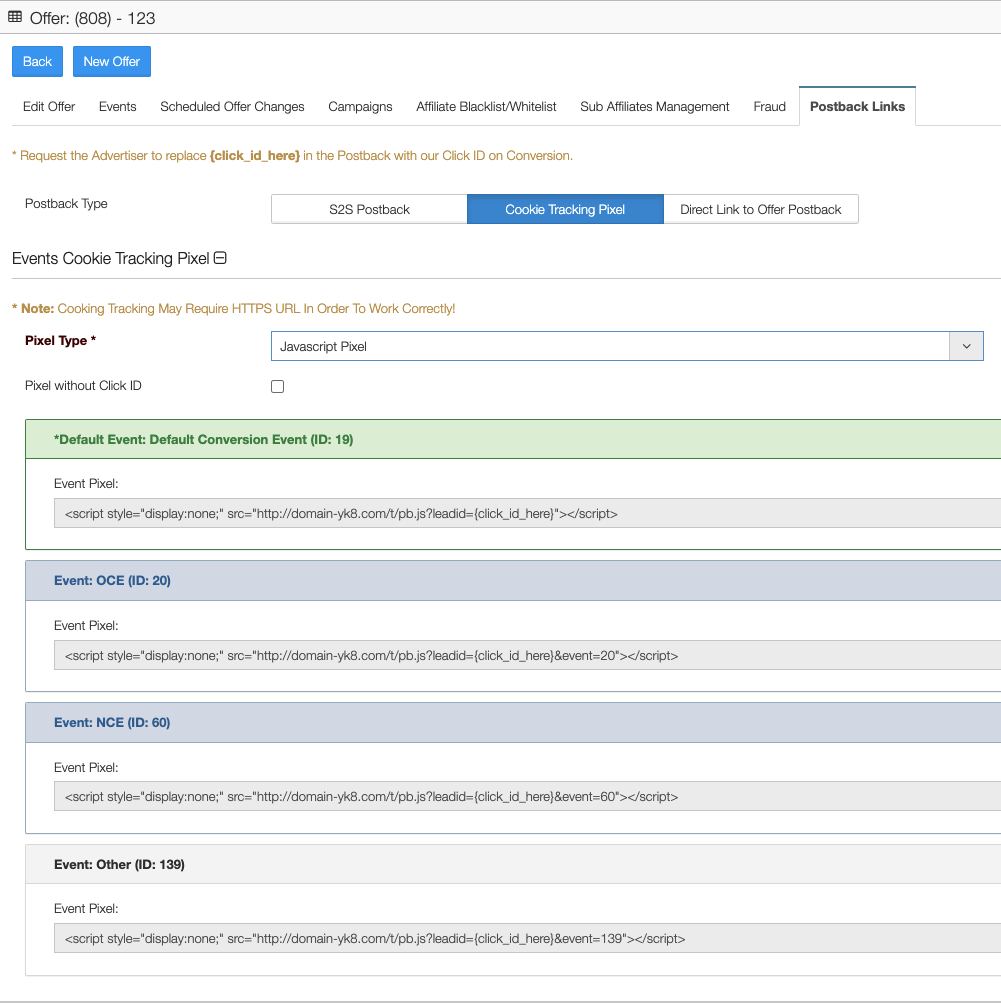
In general, you can provide the Default Event postback url, aka global postback, for the default conversion event. Make sure your advertisers put their click id token after 'leadid=', otherwise you won't be able to track the conversions. If the offer has multiple events and you need to track all of them, please sync with your advertiser the event IDs or ask them to post associated events with the associated event ID.
Pixel Postback
Other than using url link to track the ad, pixel on landing page would be needed to perform as a tracking tool. Here you should be able to find the cookie tracking pixels that may be needed. You can provide pixels of Iframe/Java/Image to advertisers according to their requirements.
📣 Campaigns
📍 Campaigns >> New Campaign / Edit CampaignCampaign is an ad unit based on an offer for different affiliate, which you should be able to have the most detailed control of each ad. You will find more details below to get your campaigns created and customized correctly.
There are several paths to create new campaigns, you can choose any which may fit your expectation:
#1 Campaigns > New Campaign
#2 Offers > Offer List
#3 Advertisers > Advertisers Detail Page > Offers
Following the instructions to create a new campaign from scratch step by step.
#1 Campaigns > New Campaign
If you only have a specific detailed campaign to create, you can create a single campaign from the New Campaign button. This path will guide you to create a campaign directly from Campaign entry.
1 Go to Campaigns
2 Click on the ‘New Campaign‘ button
3 Enter campaign details in mandatory fields
To move on, please fill in the mandatory fields with * mark:
Affiliate
Affiliate: Choose the Affiliate that you want to create a campaign.
Offer
Offer: Select or search the Offer from the dropdown.
Campaign
Name: It will default using Offer Name, the text box is editable if the user clicks on the checkbox.
URL: The user should see the URL only after saving the campaign with all the mandatory details.
Status: Choose the corresponding status for Active, Inactive, or Pending.
Media Type: Select Media Type from the dropdown.
Use Custom Received: By default, it will use Offer Received. If the user checks the box, the campaign will use a custom received amount.
Use Custom Payout: By default, it will use Offer Payout. If the user checks the box, the campaign will use a custom received amount.
Use Custom Offer Link: By default, it will use the Offer link. If the user checks the box, the campaign will use a custom offer link.
4 Save the setup and continue more detailed setup on next page
Click on “Save”, a campaign will be successfully created.
After the campaign is created, you will be redirected to a new page with more sections and fields to fill in. On the 'Edit Campaign' page, you should find basic information on there.
#2 Offers > Offer List
You can create campaigns of multiple offers for multiple affiliates in bulk.
If you already know the exact offer(s) ID or offer name, you can create campaign(s) from this path and change campaign details by editing campaign details one by one afterwards.
1 Go to Offers
2 Select offers that you need to create campaigns for
Check the box ahead of offer name in the first column to select the offers. The selected offers will present once you scroll up and click the 'Selected Offers:' button.
3 Enter and choose the affiliates that these campaigns associated to
You can create campaigns for more than one affiliate at a time.
4 Click 'Create Campaigns'
You should be able to see a pop-up notification window on top right if you have these campaigns created successfully.
Please notice that all the campaign details will follow the default setup in the associated offer, especially for Payout, Throttle, Caps, Domains etc.. If you would like to have your specific settings for these fields, please go to campaign page to update them.
#3 Advertisers > Advertisers Detail Page > Offers
Similar to #2, you can bulk create campaigns for selected offers under particular Advertiser.
1 Go to Advertisers
2 Find the advertiser that the offers belong to, click into the Advertiser Detail Page
3 Click on sub page 'Offers'
4 Select offers and enter affiliates
5 Click 'Create Campaign'
Sometimes there could be loads of campaigns to adjust and it is not efficient, or even not possible to update campaigns one by one. Therefore, if you have all the update information in a CSV, you are able to update campaign in bulk.
Users can update campaigns in bulk by uploading CSV that records relevant values.
1 Go to Logs > ‘Bulk edit by CSV’
2 Get CSV template
You can download the bulk update template from ‘Get Template' button.
3 Fill in the CSV template
Please have your latest campaign information filled in according to your need, save the CSV when finish.
4 Upload your filled CSV via 'Upload Offers'
Please click on 'Upload Offers' and have your ready CSV uploaded.
5 Select configurations
Time to Process
‘Immediately’ - Your edit will take place effective immediately.
‘Set Time’ - Your edit will take place at the time that you set.
Send Email Notification
If enabled, you can send email notification to related Affiliates or Advertisers once your update is done.
Email Notification
Choose the template that you would like to send to.
Please remember to create one if you do not have template for bulk update.
Recipients
Choose who you would like to send email to.
6 Submit and check status
After you successfully submit the CSV, you can check the process status at 'Status' page.
By default, basic campaign setup such as Name, Payout, Domain, will follow the offer setup once the campaign gets created. If you would like to customize more fields, this guide will help.
Once the campaign gets created, your page will be automatically updated and you should be able to start tailoring your campaign from 'Edit Campaign' page. Check below topics as needed:
Check the box of 'Custom Campaign Payout' and add the payout you need on Campaign section.
YD platform will use default offer domain setup for campaign. If you would like to change the default domain, you can select the domain you would like to use from the 'Custom Tracking Domain' drop down box. Please confirm with your colleagues for the domain availability before you apply it.
Redirect Destination
Redirection could have big impact on business, but all redirections could be summarized to 3 types:
Redirect to 404 - clicks will be redirected to 404
Redirect to direct URL - clicks will be redirected to the direct URL that you've set
Redirect to offer - clicks will be redirected to another offer that set in the platform
Once the campaign's status changed or redirect rule is reached (such as cap reach), the redirection will be conducted.
Redirect Rules
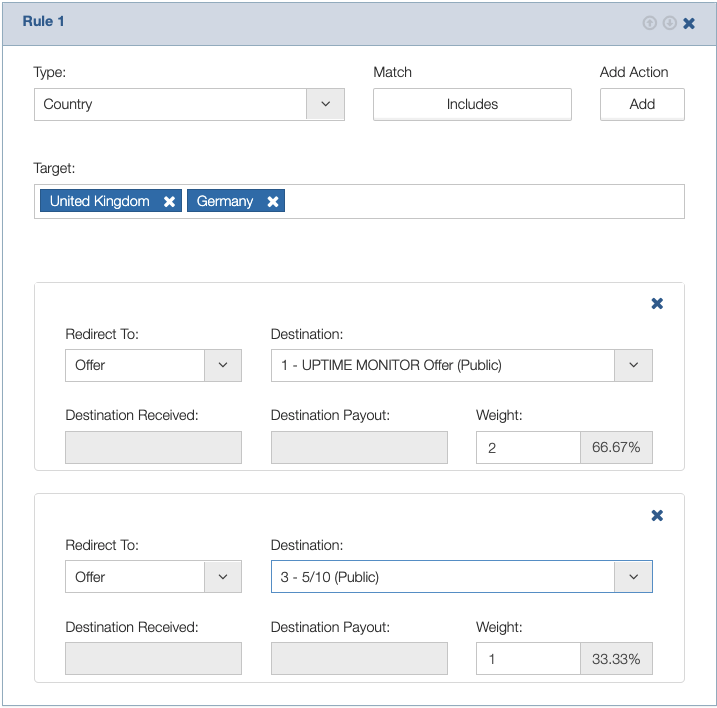
You are able to add campaign redirects at the bottom of 'Edit Campaign' page. Click on 'Add Redirect' button then you can add your campaign redirect rules. It is possible to add more than one rule at a time.
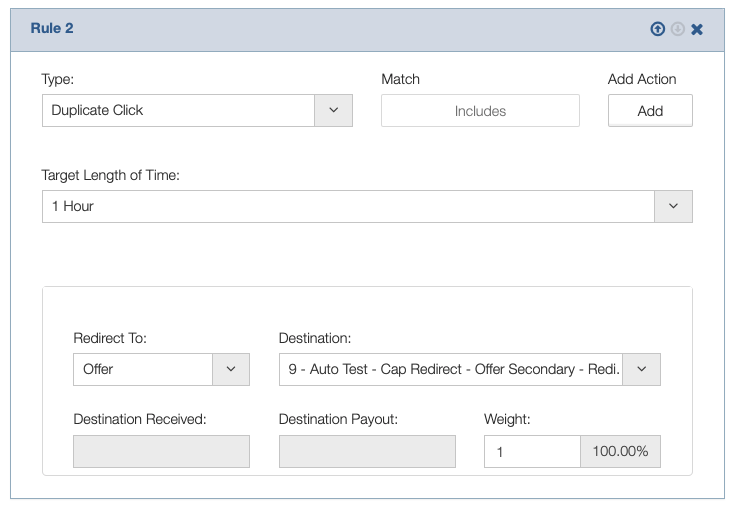
Once a click touches any of the rules, it will be redirected to the destination you set. You can set more than one destination and distribute weight to each destination. The destination will rotate accordingly based on your weight setup.
Redirect Types
Redirect type describes the redirect rule. You can decide which click identifier that you would like to implement to the redirect. Here are the types that you can set:
- Browser
- Connection - the connection way of
- Geolocation - City, Region & Country
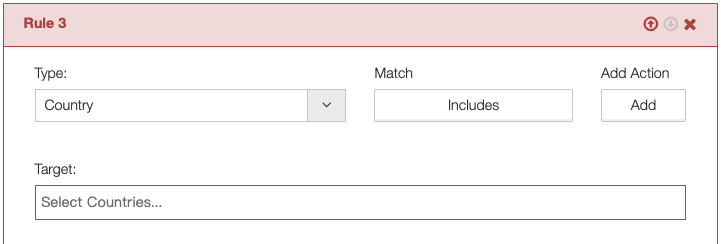
- Duplicate Click - you can decide whether the redirect rule should apply to the clicks from the same device or IP in a certain time range
- Day Parting & Week Parting
- ISP
- Device Manufacture
- Platform & Platform Version
- S Tokens
The redirect here is design to classify and optimize the clicks with S token that have no-value-passed-back as requested. If you would like to block or filter clicks with specific S token values, please use Global Throttle to work around.
Note: please notice that 'Includes' set by default means the target type selected will be redirected. If you do not want to redirect specific traffic that matches the target type, please click on the button from 'Includes' to 'Excludes' to apply the rule (while traffic that does not match the target will be redirected).
Campaign level's scrubbing setup is here.
You can decide if you would like to set the throttle on offer or on campaign internally. If you would have the campaign throttle set, it will override the offer throttle setup.(?)
By default, all the conversions will be postbacked to the Affiliate's global postback url if there is no other postback url set up on related campaigns. If there is a specific requirement from affiliate for the campaign, you can add the particular postback url at the postback section.
Also, YD platform supports pixel postback (but please be aware that Pixel setting can only be used if Advertiser is also using a pixel). Similar to S2S, you just need to add the pixel code at the pixel field.
For Facebook pixel tracking, you have 3 options to decide which would be best suiting your Affiliate:
- Facebook Event Tracking
- Facebook Campaign Tracking
- Facebook Campaign Tracking with S Parameter as Pixel ID
You can definitely have some controls on your traffic with the setup. However on campaign page, there are no settings for Affiliate/Sub Affiliate Management.
Please go to associated Offer page to have that set. You can check the Affiliate/Sub Affiliate Blacklist/Whitelist records on Campaign sub page 'Sub Affiliate Management'.
You can always have specific S parameters set on different level. Here on the sub page 'S-Token Parameters', you can overwrite the S tokens particularly for this campaign as needed or required. Please have it confirmed with your affiliate.
Campaign Caps here is the setup for the default conversion event. By default, campaign cap follows offer cap setup. Cap priority on YD platform works as Offer Cap > Campaign Cap (Specific) > Campaign Cap (Default).
If you need campaign cap to work individually, please follow below steps to customize your campaign cap:
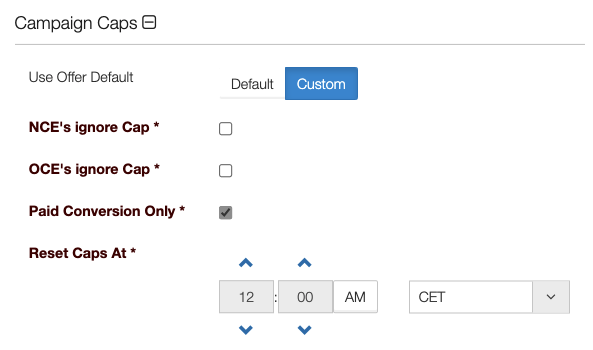
1 Choose 'Custom' at Campaign Caps
2 Check cap settings for events
NCE & OCE cap setup will also follow the campaign cap setting, You can decide if you would like to continue firing NCE or OCE to affiliate once the campaign cap reaches its limit by checking the box of 'NCE's ignore cap' and 'OCE' ignore cap'. If the box is checked, then when it reaches campaign cap, conversions on NCE and OCE will still be fired to your affiliate.
Paid Conversion is defined as 'the conversions after throttled' or 'the conversions will be postbacked to the affiliate'. If the box is checked, then the cap set here will be taken as the limit of the conversions that being postbacked to the affiliate, not the limit for exact conversion.
3 Cap Reset Time
You can set up a custom cap reset time as needed. Timezone is available for convenience.
Please kindly notice that the offer cap's reset time and timezone will take the precedence if exist.
4 Select 'Cap Reached Destination'
Please decide where will the clicks go to once the campaign cap is reached.

5 Enter Caps
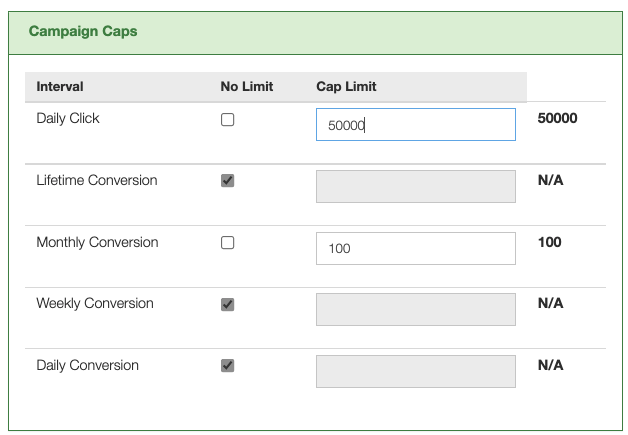
Click Caps
It is reasonable to restrict the amount of clicks. You can have click cap set up for a day by entering the expect click limit at the field 'Daily Click'.
Conversions Caps (Default Event Caps)
You can decide if you would like the cap set up for lifetime, month, week, or day. Uncheck the box under 'No Limit' column and enter the cap limit at timeframe that you are willing to conduct your expect cap limit.
As named, Cold Start feature is a campaign level activity designed to interfere the traffic performance at the beginning of the cooperation with either Advertiser or Affiliate. We achieve this by controlling the CR or EPC in 24 hours.
To help building reputation of your network and confidence from affiliates and publishers, you might sometimes need to manual fire some conversions to your new affiliates to maintain the CR or EPC.
Considering this, you can try Cold Start mode when creating/editing campaign at Campaigns section. The idea of this feature is to automatically check the EPC/CR every 30 mins and send conversions to achieve the goal EPC/CR.
Here's how you can set it up:
1 Go to Campaign > Cold Start
2 Enable the 'Activate Party Mode'
3 Select mode - CR or EPC
Please choose how you would like to control the mode.
CR - the expected result would be controlled on CR
EPC - the campaign
4 Enter Click Limit
Party needs to end. You can not always turn the party mode on unless you are OK with the risk of losing profit. So here we need to add click limit to restrict the scope of this 'party'.
5000 clicks is the maximum.
5 Enter your goal CR/EPC
6 Set effective time range, submit
Please notice that the timezone of the Cold Start is on CET (UTC+2).
Here are something you might need to be careful:
- The calculation of EPC/CR only effects from the start time to the end time that you set. It's all about the time in the future, it will not be able to count in the clicks or conversions that already received.
📊 Stats & Precision Stats
📍 Stats · Precision StatsYD platform presents a summarized tracking results at Stats Overview page, where you can also see your performance in different time range.
Go to Menu - Stats, the Stats Overview card should have Filters, Search box, and Overview Table
1. Filter option
Date Range: User could select any date you want to check for stats here
Group By: User could select different grouping criteria for Group Selection here
Approval State: User could select the data for Approved, pending, and denied here
2. Search box
Type anything you want to search here
3. Overview Table
After selecting Date Range and Group, click on Query, User should see numbers for the corresponding grouping stats.
Click on Click number from Stats overview table, it will be hyperlinked to Click log.
Click on Conversion number from Stats overview table, it will be hyperlinked to Conversion log.
Besides the Action, there's Column Filters, It will display or hide the items in columns.

4. Pivots
For every Group there will different sub criteria under Action column with icons, User could select different pivots from action column. On Click the "X" button on different subcriteria, the subcriterias will disappear accordingly.

5. Tab saving feature
User could add a new tab here and Change columns that are displayed, click on the blue save disk, the setting will be saved.

Precision Stats is a dedicated reporting tool for deeper traffic investigation. Unlike Stats Overview, it lets you pivot by dimensions that would be too heavy to load on the main stats page — such as Sub Affiliates, Events, or custom S tokens. You can combine Group By and Filters to build a fully customized report view.
How to use Precision Stats
Group By — the field you select here becomes the first column of your report and defines the primary pivot dimension. Available options include Sub Affiliate (S1), Event, Offer, Campaign, Affiliate, Advertiser, Country, and more.
Filters — narrow down the data on the right panel. You can filter by date range, affiliate, advertiser, offer, campaign, and other criteria. Multiple filters can be stacked.
Once you set your Group By and Filters, click Query to run the report.
Common use cases
- Check sub-affiliate (S1) performance: select Sub Affiliate (S1) under Group By, add Affiliate and date filters
- Analyse event-level stats: select Event under Group By to see each event's conversion and revenue breakdown
- Compare campaign performance across geos: Group By Country, filter by Campaign
🗒 Logs & Exports
📍 Logs >> Click Log / Conversions / LookupHere is where the system records the logs for all the clicks.
We would like to have some explanations about each filter section on the page, which may help to better filter and get the clicks .
Date Range: You could select the date range of the clicks details that you want to check here. Since the click data could be too huge to pull and slow down the whole platform, you are only allowed to select a date range from one to three days.
Page Results: How many results you want to show per page, default will be 25 results on each page.
Unique Clicks: When the unique click “Yes” is selected, it would show data for unique clicks only. When the unique click “Any” is selected, it would show ALL data.
Click on “Show Results” to query data, you will see proper data in the overview tab. You could also filter the data through "Filter Type".
Filter Type: As soon as you select the type, the TARGET textbox will get enabled. You could filter the data by adding multiple filters such as Advertiser Manager, Affiliate Manager, Offer, Campaign, etc.
Target: Target should show specific target types allocated for each main "Type".
Click on "Add Filter", the system will start to query data with filters you select. You could also add more than one filter here. Click on the "X" icon or ‘Reset Filters’, you could remove the filter again.
Column Controls: You could select to show or hide any columns here. Please note that if you checked or unchecked a new column, you may need to click 'Show Results' to show the latest data.
There should be 4 tabs for user to do a lookup by difference vertical: Search by Click id, Search by Conversion id, Search by Link and Search by Package
Search by Click id
You could Copy the click id from click log and paste up to 1000 click IDs in the text area on the left and all data from the click will be displayed in a table below. Ensure that each click is separated by a new line.
Click on “Lookup Clicks”, user should see data for the entered click ids in the overview table.
Search by Conversion id
You could Copy the conversion id from Conversion log and paste up to 1000 Conversion IDs in the text area on the left and all data from the conversion will be displayed in a table below. Ensure that each conversion is separated by a new line like so below.
Click on “Lookup conversion”, User should see data for the entered conversion ids in the overview table.
Search by Link
User can search by 2 options: Use a URL or Use a Token
1) User a URL
Use a campaign link to search for the information related to it. If the link was generated for our system you will see the id and name of the campaign that uses it and the affiliate, offer and advertiser related to that campaign. Campaigns links look like this:
http://example.com/t/clk?id=mZ4jfg6hfQ
Copy the link and paste into the textbox, click on “Lookup Link”, you could check Click related Information here with Campaign name, Offer name, Affiliate and Advertiser.
2) Use a Token
If you want you can use only the url query to do the search; that is all the information you need to search. For example, on the case you have a link like in our example above you can use the id part of the url, like this: mZ4jfg6hfQ
Search by Package
You can use package name to search all offers, for example: com.grubhub.android
The usage of the Conversion log is pretty similar to the Click log. It has better pivot to see conversions details comparing to other reports or logs.
Converting Events:
Manual Conversions: When the Manual Conversions “Yes” is selected, it would show data for manual conversions only. When the Manual Conversions “Any” is selected, it would show ALL data.
Approval State: It should have the following options: Approved, Pending, Denied. By Default "Approved" and “Pending” is selected. Users should be able to see Approve and Pending Conversions details with the corresponding date range on Stats Table.
Also, you could schedule the system to generate the conversion log report every day through the “Schedule Report” button. Enter Report Name and Recipients and then submit, the system will auto execute the schedule on 1:00 AM CET Every Day. You could check the details in the “Schedule Reports” page too.
For each month, the process of number confirmation could be complicated and separated as there are hundreds of affiliates and advertisers while finance team does not have place to mark down all the advertisers' approval.
Approve Conversions is designed for finance/advertiser managers to approve the conversions of related campaigns associating to different advertisers. Only when finance team approve the advertisers' conversions will they generate the invoices.
How to approve conversions
1 Enter Advertiser and their billing date range, refresh the table
2 You will see all the performance details of the advertiser in break down
3 Filter the offers/affiliates/campaigns that you need to approve (if needed)
4 Enter the amounts to approve in the box of 'New Adv. Approved' or 'New Aff. Approved'
5 Click on 'Submit' at the end of each row or 'Submit All' above the table
Note:
It will take several minutes to update the conversions status. When the new status of the conversions updated, you will see a notification window pop up
An automated invoice will be generated for the new approved totals. You will receive the notice of the new invoice on top right.
Also the origin self-billing invoice of associated affiliate will be denied automatically if it is in 'Pending' status
On YD, if you want to Add, Edit, or Remove conversions, you don't need to do them one by one. Go to Logs >> Update Conversions and use the tabs below.
Add
Fill in: Affiliate, Campaign (enabled after selecting Affiliate), Event, Payout, Receive, Quantity (up to 20,000), Date & timezone, and Reason. If you leave Is Paid unchecked, the added conversion postback will not be sent to affiliates. Click Add Conversions to fire.
Edit
Fill in: Affiliate, Campaign, Event, New Payout, New Receive, New Is Paid Status, Date & timezone, and Reason. You can filter on paid conversions, manually created conversions, and unique clicks. Click Get number of Conversions, confirm the count, and the change will be reflected in stats.
Remove
Fill in: Affiliate, Campaign, Event, Matching Payout, Matching Receive, Sub Affiliate, Date & timezone, and Reason. Filter as needed, click Get number of Conversions, confirm, and the removal will be reflected in stats.
Status tab
Each time you complete a manual conversion update the system switches to the Status tab, where you can check the result of the operation you just performed.
History tab
Enter a specific conversion ID and click Get History to see the full edit history of that conversion in the table below.
Use Generate Clicks when you need to create test or bulk clicks for a campaign without manually hitting the tracking link each time.
- Go to Logs >> Generate Clicks
- Select the campaign you want to generate clicks for
- Optionally restrict clicks to a specific country, city, or platform
- If you want conversions generated from these clicks, enter a Postback Count and choose the event, payout, and receive amount
- Enter the number of clicks to generate (up to 1,000) and click Execute
A pop-up confirms: "Generate clicks process has completed successfully."
Other than conversions, you can bulk update offers or campaigns by using CSV upload.
Edit Offers
Similar to edit conversions, what you need to do to bulk edit offers is getting the CSV template and uploading it to the system.
Edit Campaigns
Create Offers
We have this section written in Create New Offers, please kindly check from there.
💰 Finance & Billing
📍 Finance >> Invoices / Advertiser BillingYD's invoice system connects advertiser approval statements to affiliate billing. The goal is to ease end-of-cycle reconciliation and unify payments in one list. Invoices are auto-generated at the end of each billing cycle once all prerequisites are met.
Prerequisites before invoices generate
- All affiliate billing details must be entered on the Affiliate page (all * required fields)
- Billing Details Verified must be checked by Finance/Director on the Affiliate page — this confirms billing is verified and invoices can proceed
- Conversions for the billing period must be approved by the Advertiser Manager or Finance
Invoice Systems
- Default — auto-generated at end of billing cycle
- CC USA / CC AM / APAC Secondary — auto-generated at end of billing cycle
- APAC / Social / Secondary — manual approve conversion only (no auto-generation)
Troubleshooting — invoice not appearing
- Check if the Advertiser has Billing Verified checked — if not, the invoice will not generate
- Confirm conversions in the billing date range have been approved
Prerequisites
Before the system can auto-generate self-billing invoices at the end of each billing cycle:
- All affiliate billing details must be entered on the Affiliate page (all * required fields)
- Billing Details Verified must be checked by Finance/Director on the Affiliate page
- Conversions for the billing period must be approved by the Advertiser Manager or Finance
Approve Conversions
- Go to Logs >> Approve Conversions, enter Advertiser and date range, refresh the table
- Review performance details by offer / affiliate / campaign
- Enter approved amounts in New Adv. Approved or New Aff. Approved columns
- Click Submit per row, or Submit All above the table
- When Job Status = Success, the Invoice column shows Ready — click Generate Invoices
Invoice Actions
- Approve — default status is Pending. Click Approve; uncheck line items to defer them to a new Related Invoice
- Deny — requires a public note. Reopen with Reopen Invoice to return to Pending
- Regenerate — use after updating affiliate billing details; regenerated invoice reflects all changes
Invoice Systems
- Default — auto-generated based on billing cycle
- APAC / Social / Secondary — manual approve conversion only
- CC USA / CC AM / APAC Secondary — auto-generated based on billing cycle
Troubleshooting — Invoice Not Appearing
- Check if the Advertiser has completed Billing Verified — if not, invoice will not generate
- Confirm conversions in the billing date range have been approved
For urgent or ad-hoc billing fixes, you can generate an invoice manually by entering campaign details and amounts yourself.
You can surely generate invoice with entering information that you need manually.
Here are the steps:
1 Go to Invoices >> New Invoice
2 Select Affiliate that you would like to create invoice for
3 Select invoice Date Range, which means the billing period of the invoice
4 Select your invoice system
Your invoice system should follow the associated Advertisers of the items. It is recommended to only put campaigns from same advertiser or advertisers using same invoice system on the same invoice.
5 Input your invoice items one by one
Description = Campaign name or additional description
Amount = Campaign payout
Quantity = Conversions to pay
Is Credit = when checked, this item will be taken as a credit one
6 When you finish entering all your items, click on 'Submit' then you should be able to find a new invoice created in the invoice list with 'Pending' status
🔔 Email Notifications
📍 Email >> Automated Emails / TemplatesThe Email menu on the top navigation bar contains three sub-sections for managing all platform communications:
- Automated Emails — configure trigger-based emails that fire automatically when platform events occur (e.g. cap reached, offer status change, bulk update complete)
- Email Templates — create and edit HTML/plain-text email templates with dynamic tokens
- Delivery Status — review the send status of automated emails filtered by date
Each trigger can only be mapped to one active template at a time. To change the email content for a trigger, either edit the existing template or create a new one and re-associate it to the trigger.
You will see all the email triggers that have been set up here in the list. Here you could see the triggers that have NOT been set up to send out automated emails.
Click on each entry to check the trigger setup and its template to confirm you are sending the right email while conducting associated operation.
Set up new email trigger
- Go to Email >> Automated Emails, click on the 'New System Email' button
- Click on 'Trigger' dropdown box. You could select the corresponding trigger option for settings on the platform
- Click on ‘Email Template' to select the Email Template that had been created. You could also check or edit the template through 'Edit Template' Button.
- Click on 'Submit'
NOTE: automated email trigger is unique although you could create various email templates for one trigger. To avoid confusion, only one template will be associated to each trigger. Hence if you need to modify the email sent out, please either create and select a new email template or edit the current one.
Email Templates
You can create and edit email templates with available tokens.
Delivery Status
For emails sent from the automated email setup, you can check their delivery status and filtering the date.
You can set up customized email templates according to different email triggers.
Email Template List
- Go to Email - Email Templates, click on the "New Email Templates" button
- Enter Template Name, Subject, Type, and Message. Users should be able to enter, edit Html code as well as the plain text here.
- Tokens are also available in the template. Users could check the token on the right side of the page.
- After Finishing the Template edit, click on the “View HTML Preview” button or the “Send Preview Email” button to check the template. Click on “Submit” to save.
- Click on the "List Email Templates" button, It should take the user to the Email Template list page. You could also check the template through the “Create Mailing” button.
🔐 Settings
📍 Settings >> Contacts / API / Traffic / Platform ConfigContact List
Contact list is a section for users to find and adjust the account details, where they can manage the accounts which are associated to theirs.
Contact List
You can see all the account details here in the list and login to the role's view if the contact has been authorized.
Click on Name to view and edit details of the contact. You can edit the password and their timezone here.
Contact Authorities
Check the boxes here to enable their login authority and email notifications.
Click on 'Login' to log into the role's view, which might be helpful for managers to synchronize the numbers.
Add New Contact
You can also add a new user from this page by clicking on 'New Contact'.
Roles & Ad Hoc Permissions
On this platform, there are three main roles. The main differences among the roles are the accessibilities to the assets of the advertisers and affiliates.
- Director
- directors have access to all affiliates and advertisers
- Advertiser Managers
- advertiser managers are similar to affiliate managers but manage advertisers instead, although they have somewhat more access to campaigns but not affiliate details
- Affiliate Managers
- affiliate managers will manage their own affiliates/publishers and campaigns. normally won't see detailed advertiser information
Director users can edit managers permission, which allowing different roles to have their specific rights.
Permission Statements
Section
If checked:
Advertiser
Can view all advertiser
can see all advertiser details, even if the advertiser is not under his account
Affiliate
Can view all affiliate
can see all affiliate details, even the affiliate is not under his account
Can change campaign throttle
can edit throttle on campaign level
Forgot Password
Follow this walk-through article to find out how to reset password.
This guide applies to all users on the YD platform including affiliates and advertisers.
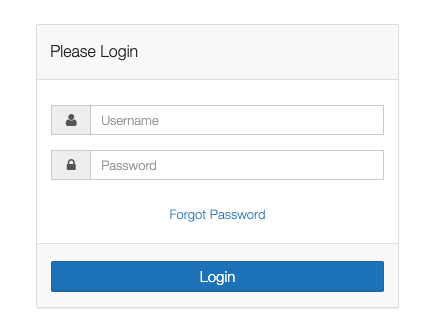
#1 Click on Forgot Password on login page
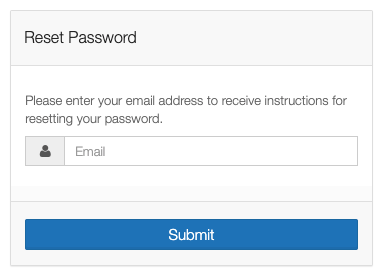
#2 Enter the email that you used to register on the platform and submit
#3 You will receive an email from the platform. Follow the instruction in the email and reset your password. Just in case, do not forget to check your spam if you can not find it in your inbox.
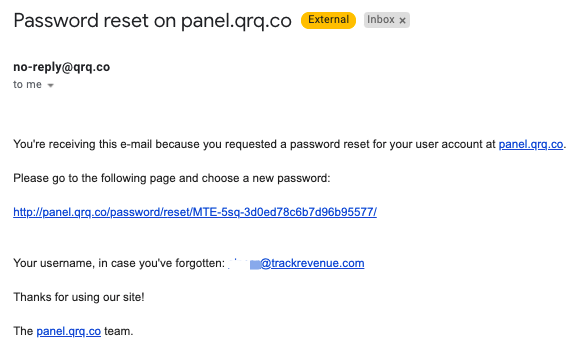
Note: if you could not receive the email notification, please ask someone who has authorization to check if you have 'Email Notification' checked via Settings > Contact List > Edit Contact > Email Notifications.
Time difference
User view: all the other datetimes (e.g. on the history page) are based on user or system time (CET)
Database view: saved as UTC in the database
API Tokens for Affiliates
Here is the right place for you to look at for those Affiliates who would like to get the campaign information via API endpoint.
Basic API integration flow for Affiliates
#1 Create an Affiliate entity
#2 Request and set their postback url on their Affiliate page
#3 Generate an appropriate API token for the Affiliate accordingly
#4 Share the API url (universal for the platform) and API key (unique for each authority) with your Affiliate, also the API help guide
#5 Wait for their confirmation and test the postback
Generate the proper API key
YD platform has three permissions for affiliates, which would have different accesses to our campaign lists:
Get All API available Campaign list
This permission allows affiliates to see all the campaigns assigned to their account, also the campaigns in 'Public' or 'Apply to Run' status.
Get Campaign List
With this permission, affiliates can ONLY get the campaigns that are assigned to them. They will not be able to see the campaigns with status of 'Public' and 'Apply To Run'.
Get Offer List
If it is fine to share the offer list with your affiliate, you can set this permission. Your affiliate will be able to see the offers of which status are not 'Private'. Moreover, campaigns will be automatically created for 'Public' offers under their account.
API Tokens for Advertisers
There are live cases of working with advertisers through API integration, which means there is also an API endpoint where YD platform can pull/post information from/to advertisers for saving some time.
If there is a need to integrate with Advertiser by API, please contact Support for help.
There are six permissions for advertisers and you can select all of them when needed:
- View all Affiliates
This permission allows advertisers to get all your affiliates in their list.
- View all Campaigns
Usually advertisers would not be able to view campaigns as campaign is on Affiliate level.
- Can Perform Click Lookup
If you share this permission with your advertiser, it means they can pull click details which were sent to them from YD's database through API.
- Create Offers
This allows advertisers to conduct POST method and send their latest offer details to YD platform via API. New offers posted through API will be generated automatically on YD offer list.
- Update All Offers
Advertisers with this permission can update their offer details on their end and sync us without sharing details by external messaging notice. This would be suitable for those Advertisers who usually have updates to conduct in bulk.
- View All Clicks
If you select this permission for advertiser, then they can see all clicks data, including details, that are sent to their account.
Blacklist/Whitelist
Blacklist/Whitelist is a place that having all the blacklist/whitelist settings in aggregation. You could find all the entries of affiliates and sub affiliates blacklist/whitelist on the list here.
From Upload CSV tab, you can bulk update sub affiliates blacklist/whitelist with filling and uploading the template provided. Both adding and deleting in bulk are available.
If you would like to bulk update the sub affiliate blacklist/whitelist settings, please go to affiliate page to conduct the edit.
Fraud Detection
YD platform helps users to filter traffic by identifying click's configurations. Users should be able to detect fraud such as duplication, quick conversions etc. with or without anti-fraud rules.
Duplication
YD considers IP coming from the same device as same click.
Quick Conversion
In CPI business, there are fraud cases of click hijacking which could be identified by looking at the CTIT (click to conversion time).
Path: Campaigns >> Fraud and Quality
Global Throttles
Too many campaigns to set up? Don't worry, we have Global Throttles for you.
Global Throttles is a feature applying throttle rules to offers that are complying to the ranges you set. Once enable, all the throttle rules will over ride the throttle on offer/campaign level.
With the setup here, you can scrub according to affiliates/verticals/geo/ISP/connection type and up to 2 S tokens.
Path: Settings >> Global Throttles
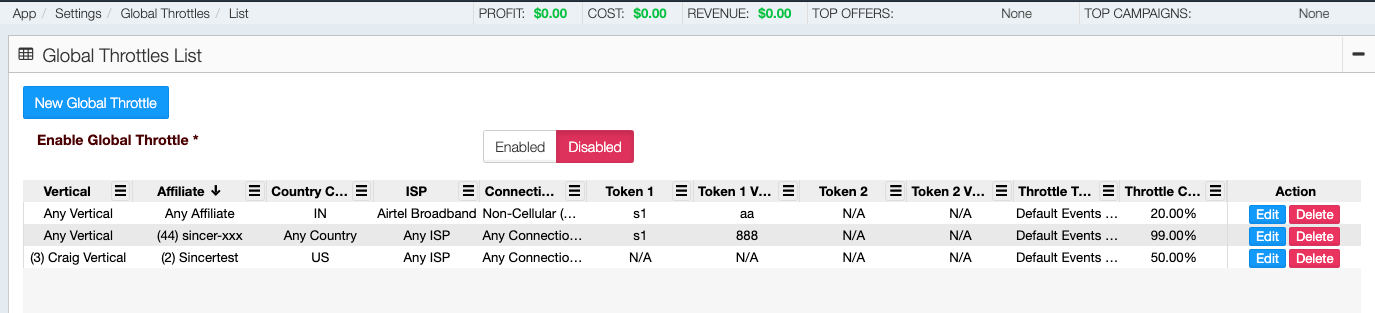
You should able to see all the set global throttle rules here in the list.
If you would like to apply all the Global Throttle rules, click on 'Enable' right up to the list and wait couple of minutes for it to effect.
If you are ready with setting up a new Global Throttles rule, click on 'New Global Throttles' button.
Set global throttle rules
You can create multiple rules to throttle conversions that match below fields in the screenshot. The expected throttle result will be complying to all the values added.
Here we designed two custom fields for S tokens which are specific for users to set up. You can input match token value for specific S token to build your throttle rule.
NOTE:
1 You can decide to scrub default event, other conversion event or both by selecting Throttle Type.
2 Throttle Cap means the percentage that you would like to throttle, e.g. Throttle Cap=20% means 20% of the conversions complying to the rule will be scrubbed.
3 The fields that are left empty will be consider as Any, which means the rule will not consider these fields to filter the conversions to be throttled.
Redirect Monetizer
Redirect Monetizer prioritize the offers selected in global redirects. You can build your own monetizer offer here with aggregating all the offers you want and arranging them in sequence.
Monetizer Exclusion
You may not want some offers to be included in the global redirect list. However your colleague might select those without knowing this. Hence, you see this tab setting to create the list of offers that you would like to exclude.
Redirect Priority
YD platform allows you to customize the priority of redirect offers that you set. To know the best EPC of each geo, you can consult Redirect Priority tab to find out the highest EPC offers of each geo to involve in the cluster of your global redirects.
Global Redirects
In this tab, you can see the list of offers and their priority in your global redirects list. Click on 'Add Global Redirect', add the offer that you would like to add in the redirect and set its priority by entering proper number.
NOTE: smaller number, higher priority, e.g. 1 is the first priority in the redirects, which mean this offer will be displayed first when audiences are redirected to the global redirect monetization.
Domains
You can set up and categorize domains at Settings on YD platform.
Find the domain entry via: Settings >> Domains
On the domain page, you can see all of your domains under different categories, verticals and their status.

If you have your domains live on your cloud server already, you can start the domain set up on YD platform directly.
Here is the guide that may help:
1 Click on ‘New Domain’ at top left corner
2 Enter your domain with the CNAME you would like to use at ‘URL’
3 Select your domain status
4 Enter your domain’s IP address
5 Fill in informational information (Vertical & Preferred Region) and select your domain (traffic) type
Domain type
- General - this domain is public
- Custom - this domain could be assigned to a certain manager account
- Spare - the domain is available but it has not been assigned/used yet. It is editable after submit the settings.

Domain Traffic Type is an informational field for you to tag the domains.
6 Submit your domain settings

Note:
Please be careful when choosing domain type. If you submit your domain to ‘General’ or ‘Custom’, only status and informational fields can be edited afterwards. You will need to delete and create a new domain entry to update your domain. If you submit the domain to ‘Spare’, you can edit the domain whenever you want before you set them to ‘General’ or ‘Custom’.
Bulk update domains for offers and campaigns is achievable on YD platform.
1 Go to Settings >> Domains >> Bulk update domains
2 Select Offer/Campaign and the old domain that you would like to change
3 Click on ‘Find Associated Offers/Campaigns’ to load the list of offers/campaigns which are using the old domain
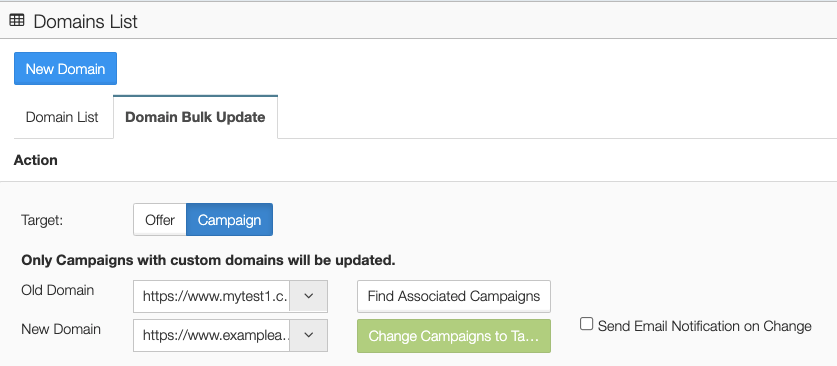
4 Select the offers/campaigns that need to change domains. Check the box of ‘Send Notification Email on Change’ too if you would like to send notification email to corresponding affiliates.
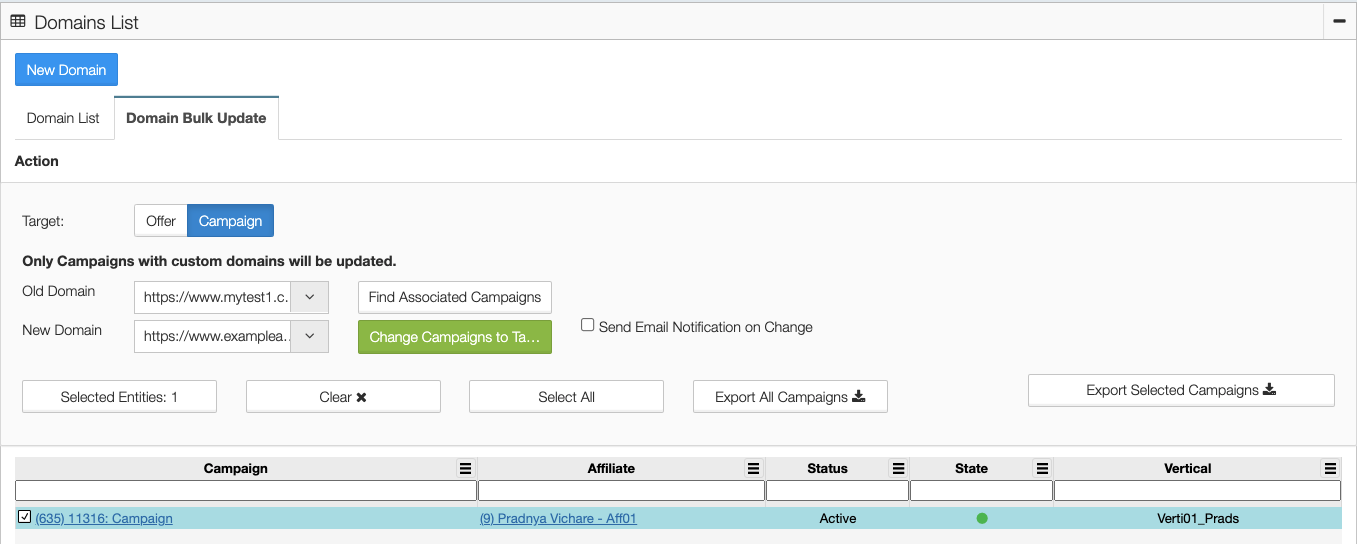
5 Confirm, click on and the new domain will be applied.
Currency
As we are doing global business, currency difference may make finance difficult.
We support the currency interchanges at the front end where you can set up the latest exchange rate by yourself.
You can set up currencies with custom conversion rates and directly effective on invoices.
Set up currency
1 Go to Settings >> Currency >> New
2 Select Currency, input conversion rate, and choose the effective time
3 Click on 'Submit' to activate your currency
NOTE: By default, the conversion rate will effect immediately to the current month and all the pending invoices that match the currency will be regenerated with the new conversion rate.
In the currency list, you can see all the conversion rate history and their details. One conversion rate can only be effective to one month period, but you can set up different conversion rate for different month as long as there is no duplicate.
Dashboard
You can set up your customized dashboard here to display announcements and notifications on YD first-seen page, aka Dashboard. You can set up news feeds, top offers and maintenance notice here to notify all the users on your platform.
News Feed
You can post up to 5 news feed at the same time.
Top Offers
This block is more designed for network users to present their best performing offers to their partners. By showing the most competitive offers, no matter automatically or by manual, you can always edit the sequence of the offers being shown by adding them in sequence.
Maintenance Message
You are able to announce every user of the platform during the maintenance time. There will be a notification bar on top of the window to notify your users that your platform is under maintenance.
Sub Affiliates
Sub Affiliates at Settings section is for Managers to manage sub affiliates in bulk and arrange them in group.
Sub Affiliate List
This is the list of sub affiliates that created and grouped.
Click on 'New Sub Affiliate' and enter the Sub Affiliate name and the Affiliate that it was under, then 'Submit' to create a new Sub Affiliate entry.
Sub Affiliate Group
Grouping sub affiliates is a way that may bring operational conveniences to you when setting up blacklist/whitelist. In the tab of Sub Affiliate Group, you can see all the existing sub affiliate groups and create your own one.
Click on 'New Group' and enter the Group Name that you want, search and select the sub affiliates on the left list, then add them to the right list. By these, you should be able to create a new customized sub affiliate group.
You can set up/add sub affiliate blacklist/whitelist in group under setups that have sub page 'Sub Affiliate Management':
Advertiser
Affiliate
Offer
Campaign
Verticals & Sub Verticals
Verticals/Sub Verticals is an informational field for YD platform users to categorize their offers.
You may notice that there are mandatory fields of Verticals/Sub Verticals on offer setup page, which need you to select from a drop down window. On this page, you would be able to find the
Build up your own verticals catalog
The construction starts from Sub Verticals as it defines a more specific scale.
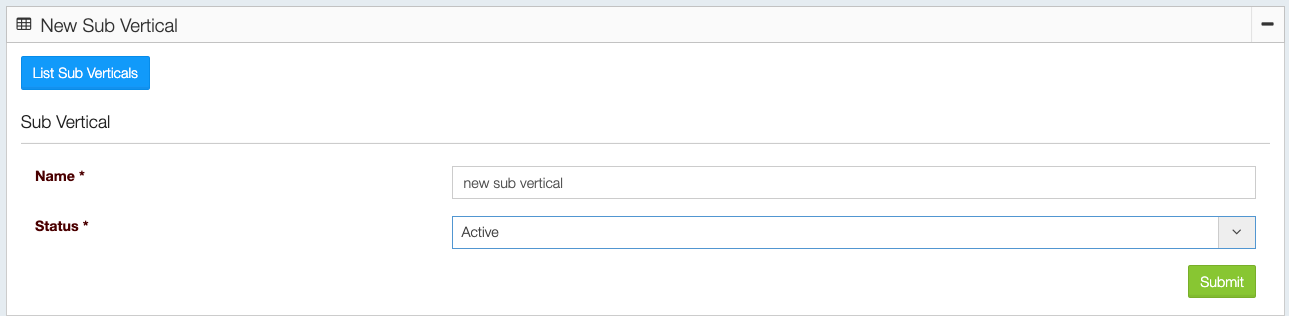
When you create a new Vertical, you will be asked to link corresponding Sub Verticals to it.
There we go, the new Sub Vertical we've just created is here at the drop down. Select, set it as 'Active' and submit.
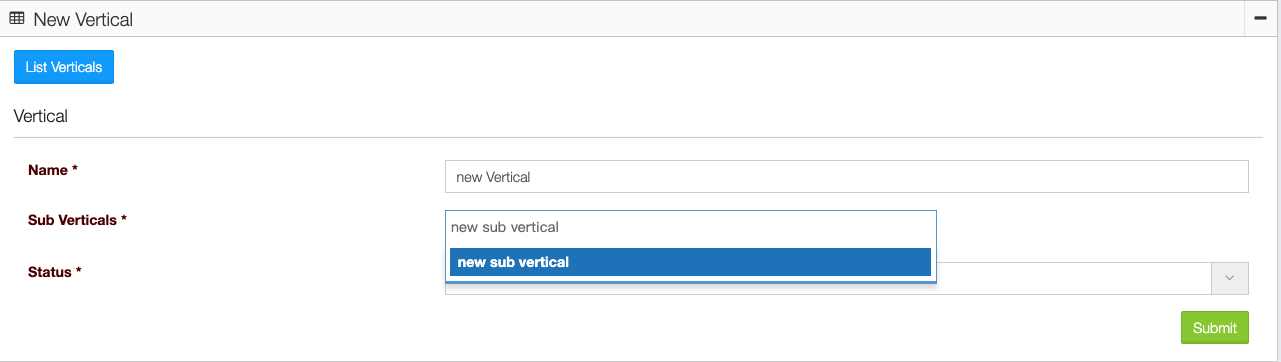
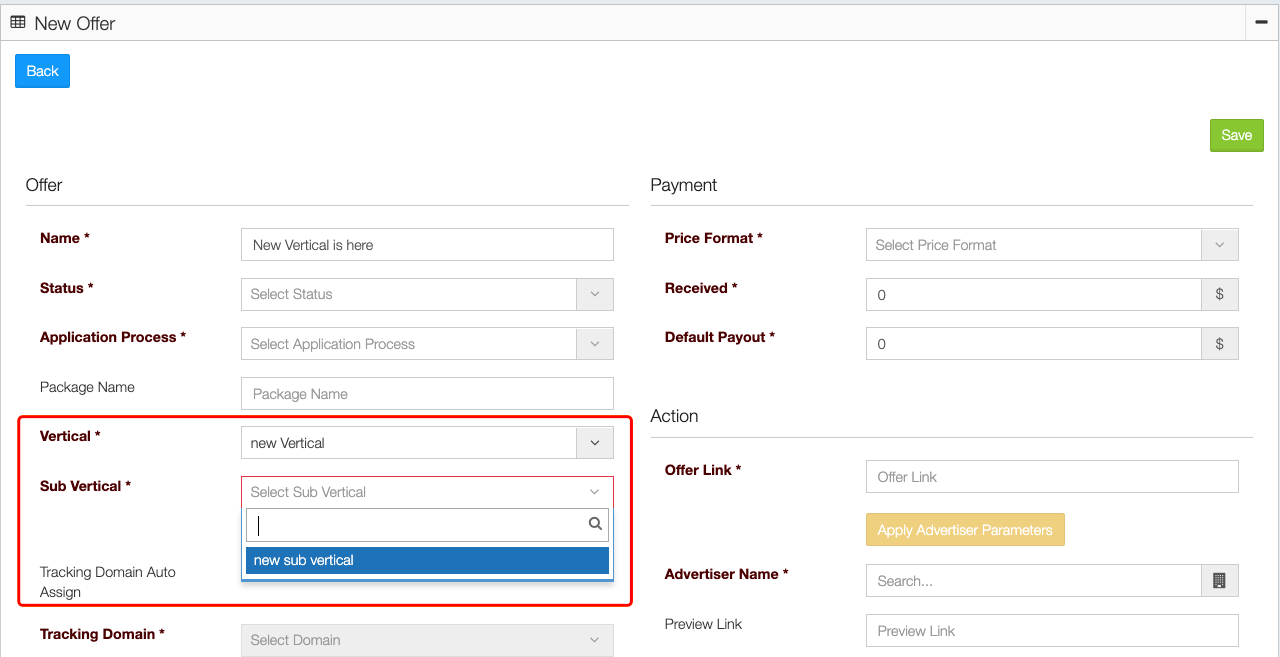
New Verticals and Sub Verticals will be effective immediately on offer set up page. You should be able to find the lately created ones available in the drop down.
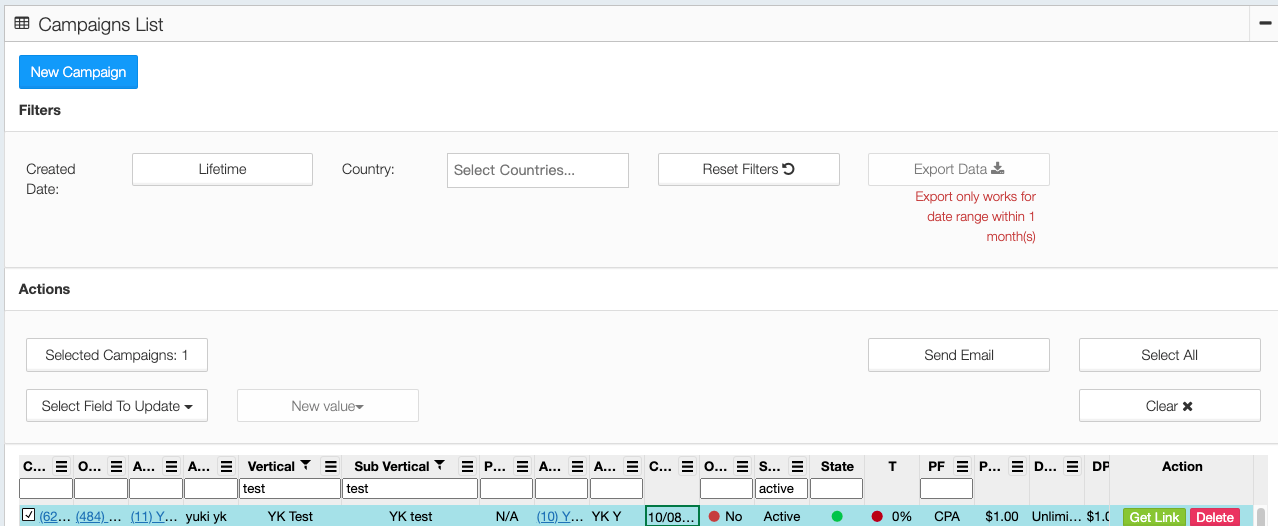
Filter Verticals
You should be able to filter the offers/campaigns by entering the keywords in the search bar on Offers List/Campaigns List.
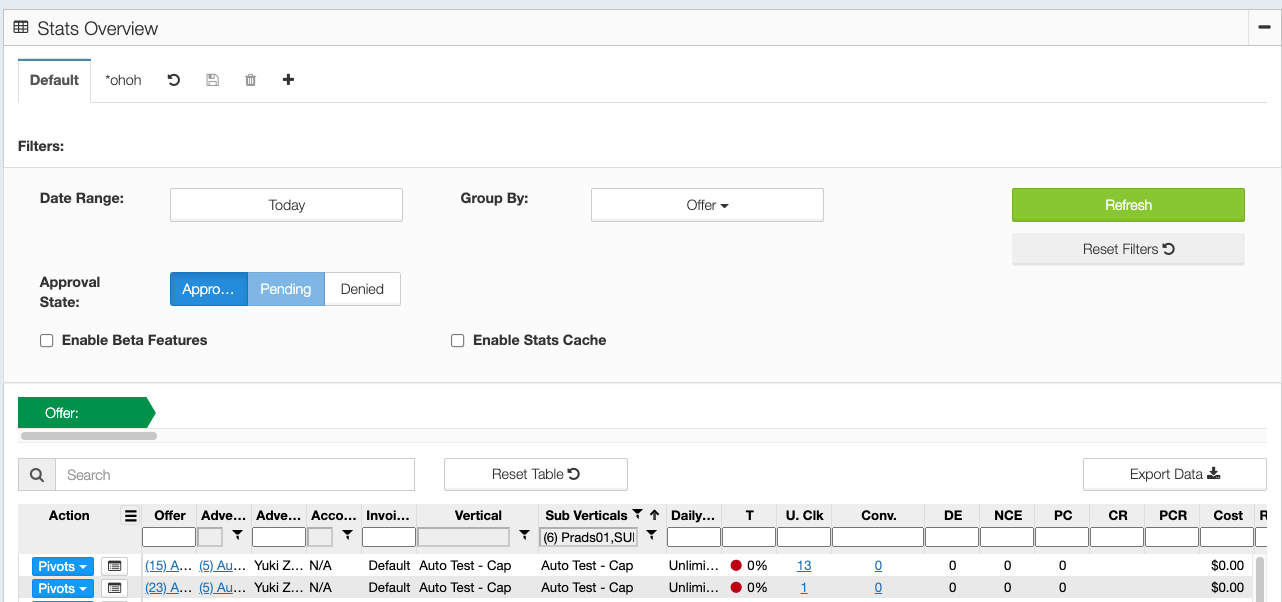
The vertical information is demonstrated and filterable at Stats Overview and Precision Stats report.
Search on YD platform
Yes! It could be annoying that you need to go through multiple pages and look for the correct information. Hence searching feature become important. Let's find out how could searching feature on YD platform empower your daily work.
Search box on the up right

See the 'Global Search' just right beside the timezone button? Here you can enter the ID/Name/any information you have of Advertiser/Affiliate/Offer/Campaign and conduct the search. With the information provided, our Global Search engine will look up the related page for you.
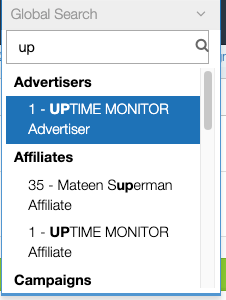
Click on the entry that you are looking for and start your modification on a new window.
Search by URL
Searching related advertiser/affiliate/offer/campaign from a campaign URL is possible on YD platform. With a campaign URL, you can search its related information through this path:
Trouble Shoot
You don't have access to this Doc
🔬 Advanced & Integration
📍 DLTO · Pixel Tracking · Partner IntegrationYD platform provides pixel scripts to integrate with Advertisers and fields to embed Affiliates pixel. Find relevant details in the articles below:
Private (https://app.clickup.com/8695805/docs/89bzx-684/89bzx-1725) Pixel for Advertiser
Set up Affiliate's pixel
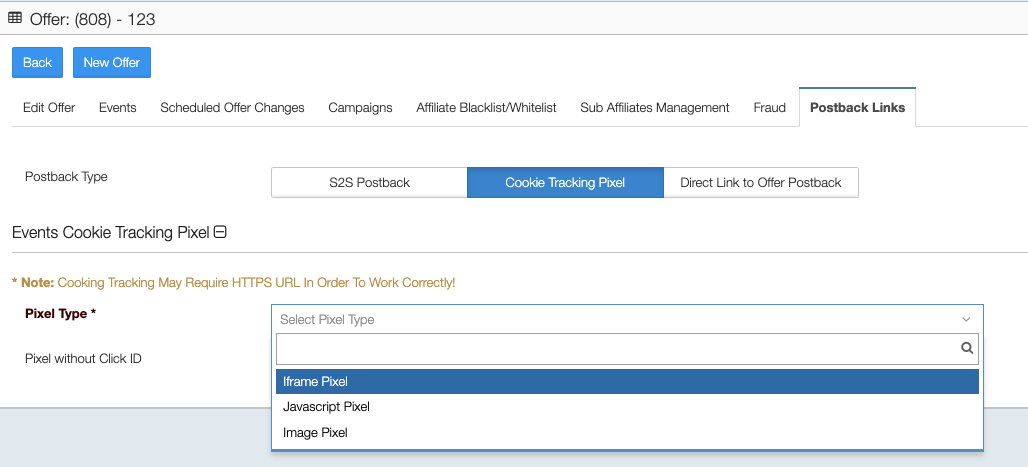
Tracking with dynamic Click ID token
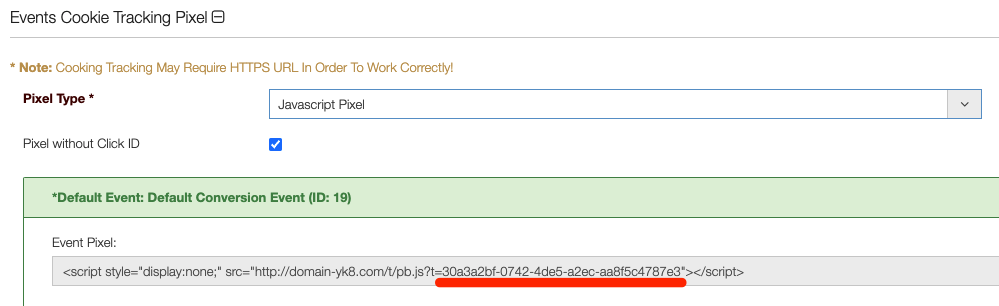
Using TikTok's API, this integration is used to push conversion data from Trackrevenue into TikTok.
Case 1 - To post conversions to affiliate's Tiktok account
Step 1: Ask the affiliate to set their TikTok pixel with 'Developer Mode', also confirm with them about the event setup that should configure at TikTok 'Event Builder'
Step 2: Paste the affiliate's TikTok pixel on the pixel field
Sample TikTok pixel
<script> !function (w, d, t) { w.TiktokAnalyticsObject=t;var ttq=w[t]=w[t][];ttq.methods=["page","track","identify","instances","debug","on","off","once","ready","alias","group","enableCookie","disableCookie"],ttq.setAndDefer=function(t,e){t[e]=function(){t.push([e].concat(Array.prototype.slice.call(arguments,0)))}};for(var i=0;i<ttq.methods.length;i++)ttq.setAndDefer(ttq,ttq.methods[i]);ttq.instance=function(t){for(var e=ttq._i[t][],n=0;n<ttq.methods.length;n++)ttq.setAndDefer(e,ttq.methods[n]);return e},ttq.load=function(e,n){var i="https://analytics.tiktok.com/i18n/pixel/events.js";ttq._i=ttq._i||{},ttq._i[e]=[],ttq._i[e]._u=i,ttq._t=ttq._t||{},ttq._t[e]=+new Date,ttq._o=ttq._o||{},ttq._o[e]=n||{};var o=document.createElement("script");o.type="text/javascript",o.async=!0,o.src=i+"?sdkid="+e+"&lib="+t;var a=document.getElementsByTagName("script")[0];a.parentNode.insertBefore(o,a)}; ttq.load('#s6#'); ttq.track('AddPaymentInfo'); }(window, document, 'ttq'); </script> <script> !function (w, d, t) { w.TiktokAnalyticsObject=t;var ttq=w[t]=w[t]||[];ttq.methods=["page","track","identify","instances","debug","on","off","once","ready","alias","group","enableCookie","disableCookie"],ttq.setAndDefer=function(t,e){t[e]=function(){t.push([e].concat(Array.prototype.slice.call(arguments,0)))}};for(var i=0;i<ttq.methods.length;i++)ttq.setAndDefer(ttq,ttq.methods[i]);ttq.instance=function(t){for(var e=ttq._i[t]||[],n=0;n<ttq.methods.length;n++)ttq.setAndDefer(e,ttq.methods[n]);return e},ttq.load=function(e,n){var i="https://analytics.tiktok.com/i18n/pixel/events.js";ttq._i=ttq._i||{},ttq._i[e]=[],ttq._i[e]._u=i,ttq._t=ttq._t||{},ttq._t[e]=+new Date,ttq._o=ttq._o||{},ttq._o[e]=n||{};var o=document.createElement("script");o.type="text/javascript",o.async=!0,o.src=i+"?sdkid="+e+"&lib="+t;var a=document.getElementsByTagName("script")[0];a.parentNode.insertBefore(o,a)}; ttq.load('tiktokpixelid'); ttq.page(); }(window, document, 'ttq'); </script><script>!function(e,t,a){var n=t.getElementsByTagName("script")[0],c=t.createElement("script"),i=function(){n.parentNode.insertBefore(c,n)};c.dataset.id="62bae356ea5d50d096e4ecf1",c.type="text/javascript",c.async=!0,c.src="//phoenix-widget.com/static/js/pixel.js","[object Opera]"==e.opera?t.addEventListener("DOMContentLoaded",i,!1):i()}(window,document);</script>Step 3: Select Facebook option (3-campaign)
To create a TikTok pixel and share it with your partner in Affise, follow the steps below:
- In your Ads Manager profile, click Assets > Events.
- In the Web Events box, click Manage.
- Click Create pixel and select TikTok pixel as a connection method.
- Enter a pixel name and select Manually Install Pixel Code.
- Select Developer Mode for more customization.
- Wait until the pixel is created and copy your pixel code.
Also, you can send the pixel via email or download it to your device.
TikTok pixel example:
<script> !function (w, d, t) { w.TiktokAnalyticsObject=t;var ttq=w[t]=w[t]||[];ttq.methods=["page","track","identify","instances","debug","on","off","once","ready","alias","group","enableCookie","disableCookie"],ttq.setAndDefer=function(t,e){t[e]=function(){t.push([e].concat(Array.prototype.slice.call(arguments,0)))}};for(var i=0;i<ttq.methods.length;i++)ttq.setAndDefer(ttq,ttq.methods[i]);ttq.instance=function(t){for(var e=ttq._i[t]||[],n=0;n<ttq.methods.length;n++)ttq.setAndDefer(e,ttq.methods[n]);return e},ttq.load=function(e,n){var i="https://analytics.tiktok.com/i18n/pixel/events.js";ttq._i=ttq._i||{},ttq._i[e]=[],ttq._i[e]._u=i,ttq._t=ttq._t||{},ttq._t[e]=+new Date,ttq._o=ttq._o||{},ttq._o[e]=n||{};var o=document.createElement("script");o.type="text/javascript",o.async=!0,o.src=i+"?sdkid="+e+"&lib="+t;var a=document.getElementsByTagName("script")[0];a.parentNode.insertBefore(o,a)}; ttq.load('CAQR4L3C77UB8MCO32UG'); ttq.page(); }(window, document, 'ttq'); </script>7. Complete your pixel setup.
This guide will explain how to post conversions from YD to a Facebook account if you or a Partner is buying traffic there.
You can have S2S integration with your Affiliate meanwhile have the conversions posted to their facebook account via their Facebook pixel. It will be achieved in 3 steps:
#Step 1. Ask for your affiliate's Facebook pixel in script
#Step 2. Paste the Facebook pixel at pixel field under Campaign Postback tab
#Step 3. Provide your affiliate the campaign URL with S6 token
*Please kindly ask your affiliate to send their Facebook pixel ID via S6 when they start their traffic on Facebook
Sample Facebook pixel with dynamic token #s6#
<!-- Facebook Pixel Code --> <script> !function(f,b,e,v,n,t,s) {if(f.fbq)return;n=f.fbq=function(){n.callMethod? n.callMethod.apply(n,arguments):n.queue.push(arguments)}; if(!f._fbq)f._fbq=n;n.push=n;n.loaded=!0;n.version='2.0'; n.queue=[];t=b.createElement(e);t.async=!0; t.src=v;s=b.getElementsByTagName(e)[0]; s.parentNode.insertBefore(t,s)}(window, document,'script', 'https://connect.facebook.net/en_US/fbevents.js'); fbq('init', '#s6#'); fbq('track', 'Lead'); </script> <noscript><img height="1" width="1" style="display:none" src="https://www.facebook.com/tr?id=#s6#&ev=EVENT&noscript=1" /></noscript> <!-- End Facebook Pixel Code -->If your advertiser is asking you to track his conversions by pixel, you can find the guide here.
You can always look at Help page on the platform for further information. Same token could mean different in different section.
#ip_address# token is different depending on the part of the Help page.
The section you're looking at is "Postback Tokens" but this is actually talking about tokens used on publisher/affiliate postback links. So in this case, #ip_address# is referring to the ip address of the conversion request that happened (this can be the user on a pixel postback, or the advertiser's server on a s2s postback). And the #source_ip_address# refers to the original click ip address.
There's another section "Offer Tokens" which I think is what you want and it refers to tokens used on offer links. Here it has #ip_address# but this is referring to the click ip address.
Most seen cases
- Cannot receive test conversion from the advertiser
- Cannot receive the test event from the advertiser
- API integration
- Stats Discrepancy
S2S integration test with Advertiser
Allowed YD postback parameters:
- user-ip - user's ip address recorded from advertiser
- user-ua - user's user agent recorded from advertiser
- s1-s10 - assign YD s tokens from advertiser's postback
- event - YD event id/api name that matches the advertiser's event
Usual Seen Issues:
- Aff could not receive test conversion
- Test by Test Aff Postback succeeded but Aff does not receive the test lead
- Token setup
Sometimes, you may meet an invalid affiliate postback test which may annoy everyone. You may be able to find out something useful in this section to troubleshoot.
Test with Advertiser
Usual seen scenarios for not receiving test conversion:
1 Mismatched #subid#
2 Incorrect postback url set up on advertiser side
3 Key parameter(s) missing
4 IP/GEO/specific parameter(s)/device blocked by advertiser
5 Invalid value of #subid# from advertiser that causes rejection of YD platform
Theoretically the platform is not able to reject conversions. In general, the postback will work as:
the advertiser get their click ID from the test link we share --> they use their postback link to fire a virtual conversion to YD --> YD's postback url set on the Advertiser's platform gets triggered --> YD receive the conversion.
6 Not landing on advertiser's offer page
Solution: do not evolve the redirection in a test campaign
Common scene
1. Provide the postback url to the advertiser and ask the advertiser to set it up like:
https://go.yourpostbackurl.com?pb/leadid={adv_click_id}2. The Advertiser will set it up on their side. For a test, the advertiser will share an offer link as:
https://advertiserofferurl.com/test/offeridNote: it is not suggested to have a redirect/throttle set on the test offer.
3. We add the parameters as the advertiser requires at the end of the tracking link. Please check Help Page for parameter guide. Click ID is required:
https://advertiserofferurl.com/test/offerid?clkid=#subid#&pubid=#aff_id#_#s2#4. Generate a test campaign url and send the advertiser the campaign link.
https://campaignurl.com/campaigntoken?s1=[[clickid]]&s2=[[pub_id]]5. Ask the advertiser to click on the campaign url and send a virtual conversion/lead. Check the conversion on the platform after a few minutes.
Test with Affiliates
There are two ways of integration test that you can fire a conversion to the affiliates:
- Test Affiliate Postback feature on the platform
- API link fire
Usual seen scenarios for affiliates not seeing test conversion:
1 Mismatched parameters
2 Incorrect affiliate's postback url set up
3 High percentage throttle set up on test campaign
4 Invalid test link from affiliates
5 Test click not going through the campaign link
Test click is redirected because of Redirection/blacklist/whitelist setup
Direct Link to Offer is a feature to allow publishers to run ads and send parameter values directly to the offer link without the need for a custom campaign link. This also allows advertisers to send conversions/leads to us without a click ID and click attribution.
Use Cases
Direct Link to Offer could be applied to the tracking of different Ad types, as long as the Advertiser supports S2S tracking. Here are some cases which may need Direct Link to Offer feature in the real business practice:
Tracking of conversions without any click information
- Appsflyer Advanced Privacy mode - Tracking installations of iOS 14.5+
Allowing trusted publishers access to direct links to the final offer page to reduce the number of redirects on a click
- Ecommerce offers
- More reliable analytics for publisher's 3rd party tracking platforms (FB/Google) due to direct linking to the offer page.
Feature Description
We want to make it possible for publishers to run ads directly to the offer link without the need for a custom campaign link. However since we still require click/conv information, we will have the publisher and advertiser forward us this information instead of tracking via normal click redirects.
The main difference on the flow of DLTO is how we no longer receive user clicks and advertisers will no longer send the unique click identifier (click id/leadid/subid) to us. Please see below for more details:
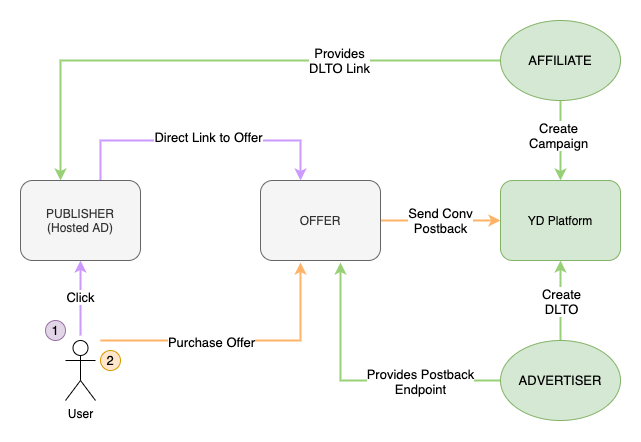
Ad Flow Attribution Flow
- Advertiser distributes the Ad to TR
- TR adds the parameters for tracking and attribution
- TR sends the Ad attached with params to publishers/affiliates
- Publishers/Affiliates display the Ad
- End user sees the Ad, clicks on the Ad and makes a conversion
Conversion Postback Flow
- User clicks on the DLTO Ad with ‘campaign id param name’ and other parameters, and triggers the conversion event(s)
- Advertiser gets all the details of the conversion
Advertiser sends TR the conversion info and the postback, including:
- Campaign Token of TR
- Additional Parameters set on the DLTO link
- Publisher added parameters on the tracking link
- TR receives the postback, shows it on the stats, and sends the conversion to the publish
Benefits
- Eliminate the need for extra redirects thus making the process more seamless.
- Reduces the need for extra domains.
Current Limitations
- **Currently there is no especially S2S url for adding clicks data. We are planning to add a click endpoint for affiliates and/or advertisers to add click data via S2S, but since these conversions cannot be tied to click attribution, adding click is solely for stats data only.
- Not able to use Redirect Rules because clicks don't actually go through our system, there is no way to redirect traffic.
- Not able to add Click Caps because any clicks we receive will be server to server and not live user clicks.
On the offer setup page, you will see there is a DLTO enabling button.
Click on 'Enable' and start your tracking without clicks.
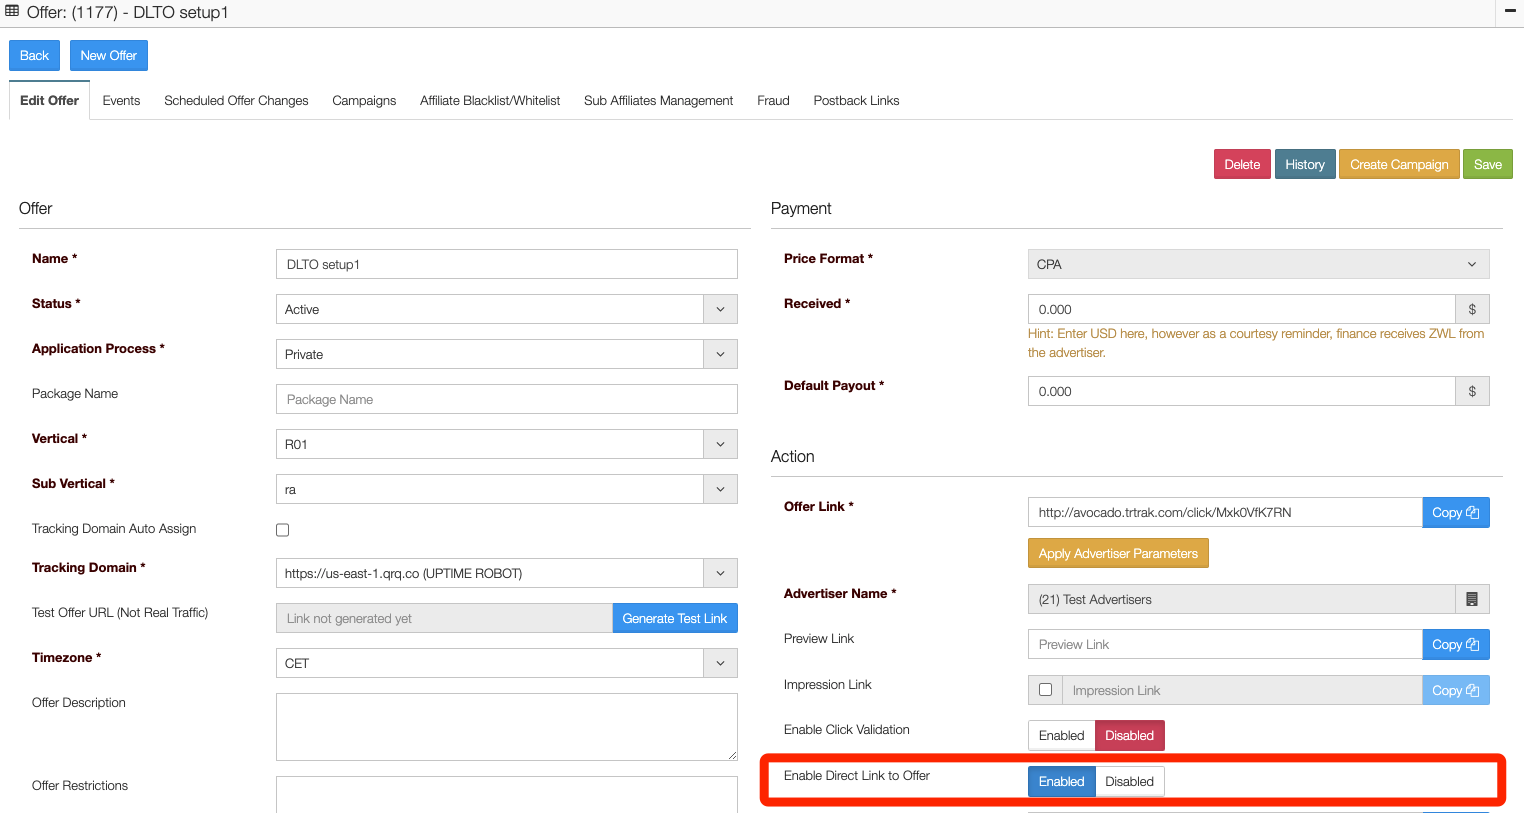
You can find out how to set up DLTO offer and apply the in this article.
Step 1. Enable DLTO
Navigate to the Offer page, create campaigns for related affiliate/publisher and enable Direct Link to Offer toggle at Offer section.
- This will NOT be available on any campaign until the offer has it enabled and saved.

Step 2. Fill in parameter names
Fill in DLTO parameters onto DLTO link as required by the Advertiser, save.
*Mandatory Fields or Params
There are two fields that is mandatory for this tracking.
DLTO Base URL: static part of offer link.
- The advertiser’s tracking link without attaching dynamic parameters (parameters that might be different for different publishers running the offer), but may contain parameters that are static or the same regardless of the running publisher (this is also exposed to the publishers).

Campaign ID Parameter Name: the parameter name that is used on the advertiser platform where we can send our campaign token.
- Our system will attach #CampaignToken# as the placeholder automatically and this will be the identifier of the tracking to the attributed campaign once we receive a conversion from the advertiser. In most cases, this would be a custom parameter on the advertiser platform.

*Optional Fields / Additional Parameters
Usually, we will need more information Additional Parameters for the optimization, hence we need to add additional parameters. These are parameters that are passed from the publisher and passed to the advertiser where we can then receive when the advertiser sends us conversion postbacks.
Generally these parameters can be sub affiliate ids, device ids, ip, geo info, etc.
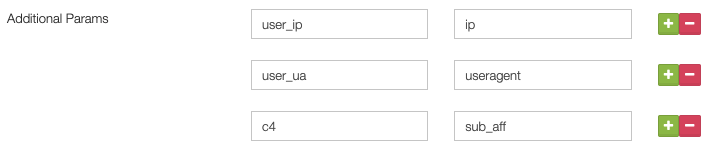
There are two columns for the Additional Parameters setting:
Parameter Name (Left)→ The parameter name here should be parameters that need to be appended on the offer link.
Parameter Placeholder (Right) → What should be entered here should be the hints for what to fill in for Affiliate Managers/Affiliates. You don't need to put in the bracelet as it will be automatically attached to the DLTO tracking link.
Parameter Name
(Sample)
Placeholder Hints
Sample on DLTO tracking link & Description
user_ip
ip
i.e. &user_ip={ip}
User IP that recorded on the advertiser side.
user_ua
user agent
i.e. &user_ua={user agent}
User agent recordd on the advertiser side
aff_sub1
pub_clickid
i.e. &aff_sub1={pub_clickid}
You can send publisher's click ID to one of the empty parameters on Advertiser side as a unique identificator. Also, considering the need of sending conversions to the publishers with their global postback, you should append the publisher's click ID.
Step 3. Save the offer
After saving the offer, you will see the preview DLTO url populated in the field DLTO Preview Link.
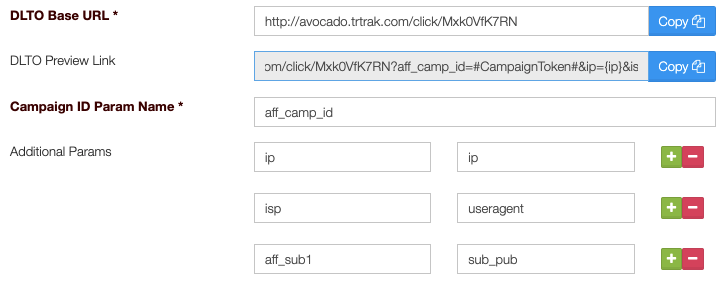
The parameters with {} indicate the expected values of Additional Parameters, also the value that the publishers/affiliates should send.
Step 4. Update DLTO Postback Url with the Advertiser
Go to the Offer (which has DLTO set up) and navigate to the ‘Postback Links’ tab, click on Direct Link to Offer Postbacks and copy the URL for the Postback Type.
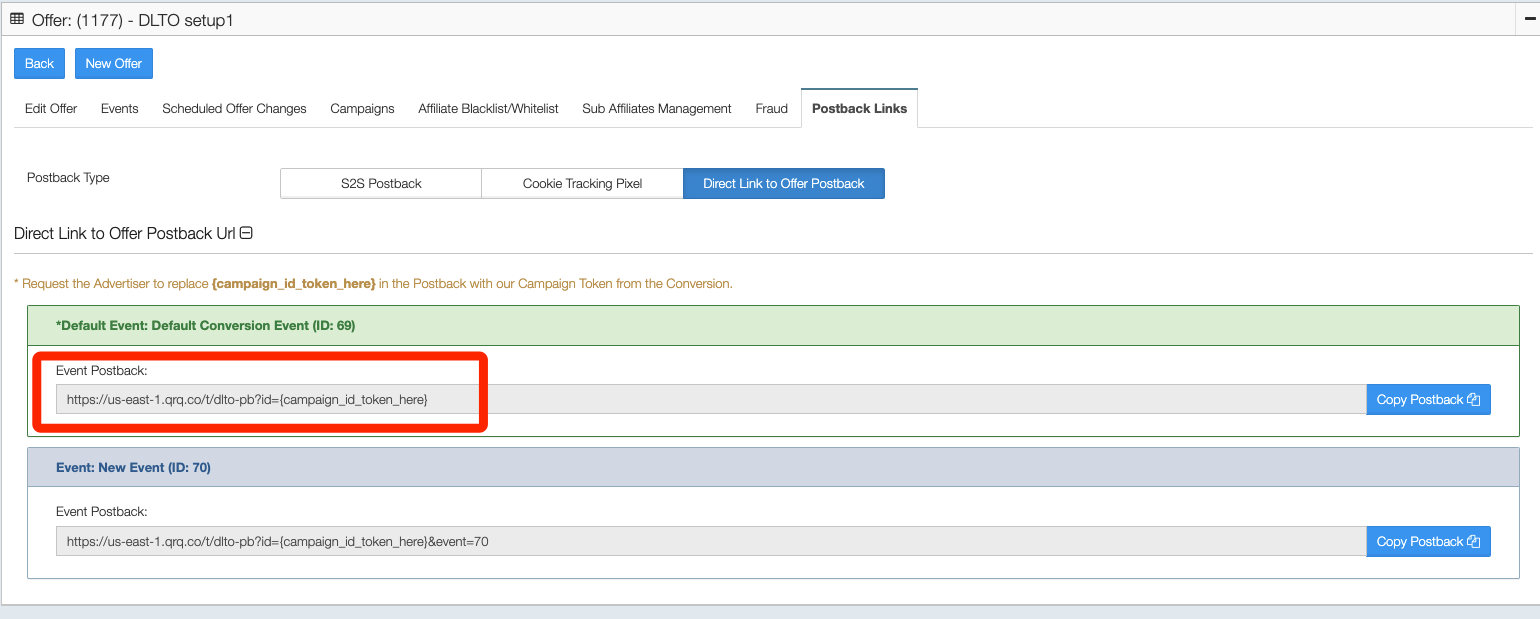
Copy the DLTO postback URL, provide it to the Advertiser/update on the Advertiser's platform with the campaign ID token that set on the offer.
Example
If postback URL set as: https://api.postbacklink.com/t/dlto-pb?id=[[campaignid]]
Then, on DLTO setup Campaign ID name field: campaignid
Tips & Notes
- If the advertisers are still sending S2S click tracking conversions to us, please ask them to just update the postback for this offer specifically on their end without covering your global postback URL
- Please notify the Advertiser that the ‘id’ field should contain the campaign token id that was passed to them in the DLTO link. This will allow us to associate the conversion with a campaign so that the affiliate can be properly paid.
- If the offer has multiple converting events, please ask your advertiser to set up/update the DLTO Postback url for the events as well.
Additional Considerations
Here are several things that you may need to make sure before you start the traffic.
Confirm parameters (Before enabling DLTO)
Please confirm with the Advertiser the parameters that you/your affiliate or publisher need and the value sample values that the Advertiser expects. You need to know the parameter name and its value format that the advertiser accepts.
Note: we will need to fill in the parameter names on the advertiser side and the parameter values on the publisher side. Therefore, it will also be necessary to confirm the value format that the advertiser accepts for the tracking.
Here are some samples:
Parameter
Parameter Name
[Provided by Advertiser]
Expected Parameter Value Format
{Provided by Affiliate}
Ip address
user_ip
192.168.0.0
User Agent
user_agent
Chrome
device
device
iPhone12
City
city
newyork
Confirm DLTO postback url on the Advertiser side (After saving the DLTO setup)
Because DLTO uses a different conversion postback endpoint, postback url on the Advertiser's platform MUST be updated. Please take the DLTO postback url from the Offer page and ask the Advertiser to update (or directly update on Advertiser's platform) the postback url for this specific DLTO offer on their end. Most postback parameters will still work (such as event ids).
Note: do not replace the global postback if there are still live click-based tracking offers
Step 1. Navigate to DLTO Campaign
Create a new campaign directly from a DLTO offer, or navigate to DLTO offer associated campaign details page and see the Campaign section.
Note: if you are creating a new campaign, you will not see the Direct Link to Offer URL nor get the campaign active until the parameters placeholder details have been filled.
Step 2. Enter Affiliate's parameters in the placeholders
Confirm with your affiliates/publishers about the specific values for the advertiser required parameters (the Additional values/Affiliate’s placeholders for parameter name sets) and the mandatory parameters that they need, then enter them respectively.
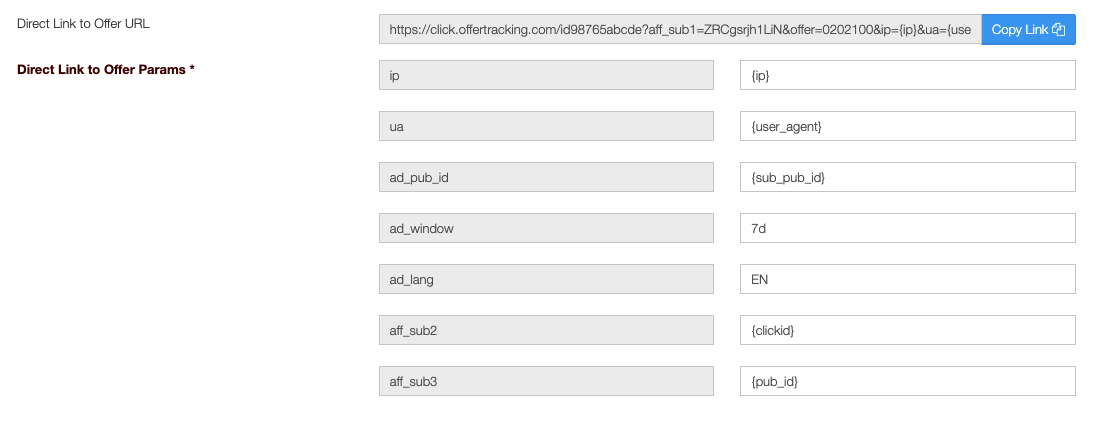
You can either keep the placeholder as it is on the DLTO offer or hard code the parameter without attaching affiliate's bracelets.
Note: as the relationship between offer and campaign is one-to-many, that means that each campaign is able to fill out their own parameters without affecting the other campaigns.
Additionally, many publishers will use special tokens that are replaced on their platform. Affiliate managers should confirm with their affiliate about what values to put to make things easier before setting up the DLTO.
Step 3. Save and update
Save the campaign and get the latest DLTO campaign link with the values added.
The "Copy Link" button only updates with the new URL after saving!
You can copy the DLTO campaign url via the field ‘Direct Link to Offer URL’ under the Campaign section.
Example DLTO Campaign URL to share with publishers:
https://www.offerlink.com/?adv_campaign_field_name=x6tJhqlUo6FD&sub_pub={subpublisher}&user_ua=chrome&user_ip=192.168.0.1Additional Considerations
To get a DLTO campaign to work on the affiliates/publishers side, as a Campaign/Affiliate/Publisher Manager, you will need to coordinate with the Advertiser Manager on setting up the offer parameters and communicate with the affiliates/publishers to make sure the parameters values that put onto the DLTO are aligned with what the advertiser expects.
Here are some suggested to-dos before running to setup:
- Confirm with the Advertiser Manager of what parameters the Advertiser needs and their expected format
- Communicate with your Affiliate/Publisher that if there are other parameters which the Advertiser does not require to send while the Affiliate/Publisher does need.
Following the trend of privacy policy released after iOS 14.5+, Appsflyer will no longer send Click ID to its partners who do not have dual consent on advertiser APP and publisher APP.
Ad network Advanced Privacy data-sharing principlesStarting iOS 14.5+ the AppsFlyer Aggregated Advanced Privacy Framework (AAP) provides advertisers with the ability to control the availability of user-level attribution data provided via the AppsFlyer platform. In the context of ad networks, the AAP framework is implemented using Advanced Privacy (AP). For ease of understanding, the terms Advanced Privacy and AP are used interchangeably in this article. AP doesn't impact the availability of aggregated data available to partners or ad networks. What data is affected by APWhen AP is on, user-level data for non-consenting users running iOS 14.5+ is not available via postbacks or other reporting methods including Protect360 fraud-related reports.In the context of postbacks it means that different types of postbacks are used depending on a user's ATT consent status and other factors.For partners who has agency or Ad Network account will need a workaround to receive iOS 14.5+ conversions. A tracking method is needed, which should be able to receive the conversions without having a Click ID as the mandatory postback trigger component.
Direct Link to Offer (DLTO) will be a solution.
Setting up DLTO tracking on Appsflyer
Step 1. Set up DLTO postback on Advertiser side
Integrating DLTO postback would be a one-time activity.
First of all, we need to get the DLTO postback. You first need to enable the DLTO feature on the offer page, look at the tabs on top and find the DLTO postback url on tab Postback Links >> Direct Link to Offer Postback:
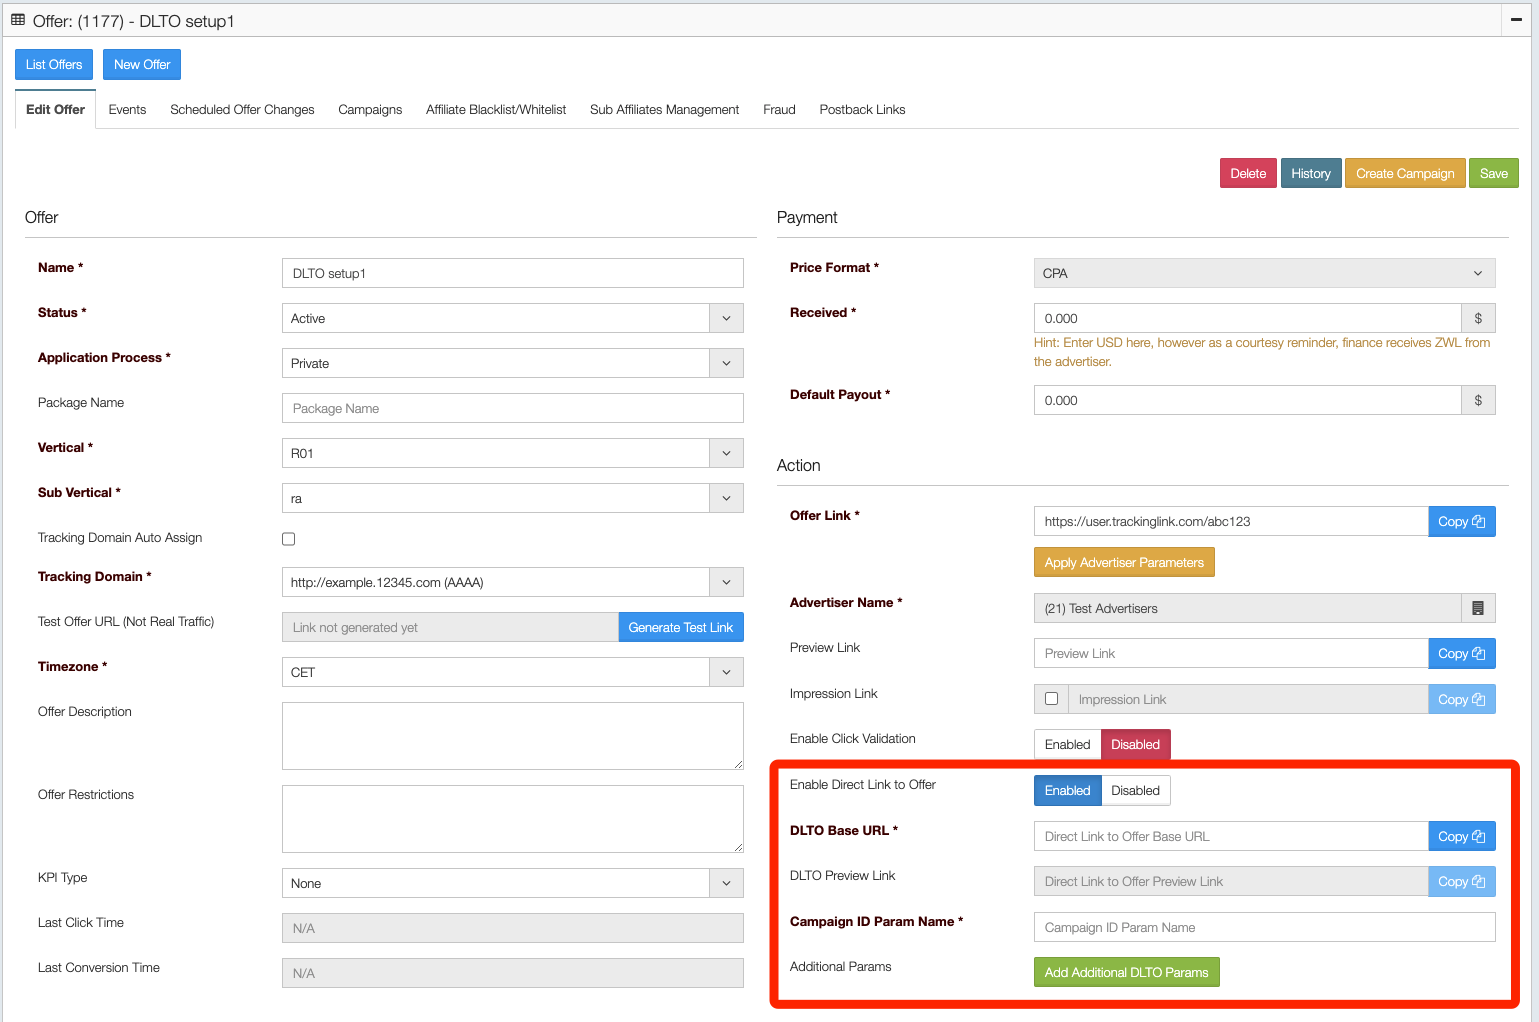
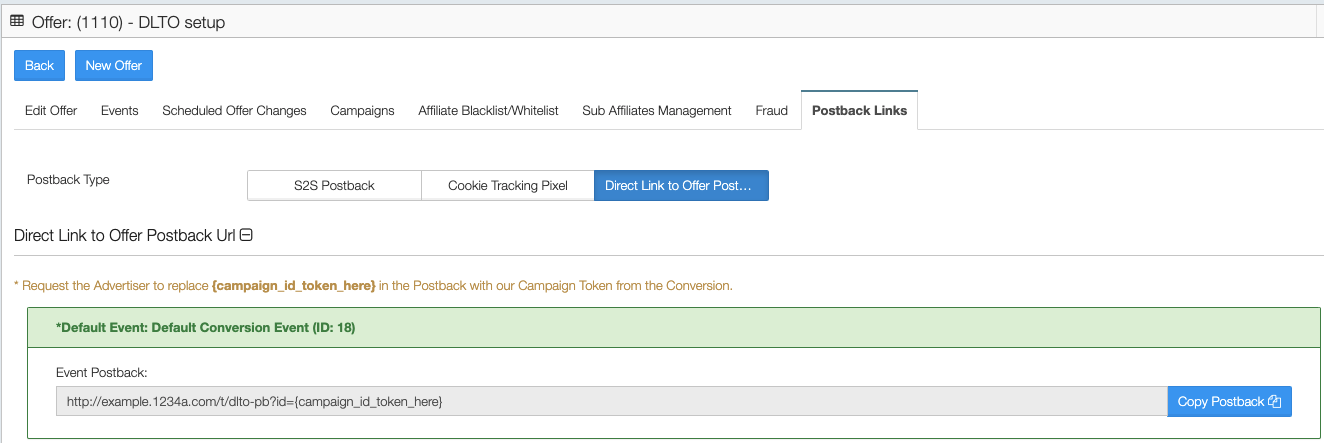
Now let's go to Appsflyer and set the DLTO postback. You need to go to 'Postback Management' and activate the Advanced Privacy mode by following Appsflyer's guide, please refer HERE and navigate to the Advanced Privacy postback set up page.
Detailed Postback Setup
Baselink
On Appsflyer, you'll need to enter the static part of our DLTO postback url in the Endpoint addresses field.
See example on AF: http://cl.trackrevenue.com/t/dlto-pb
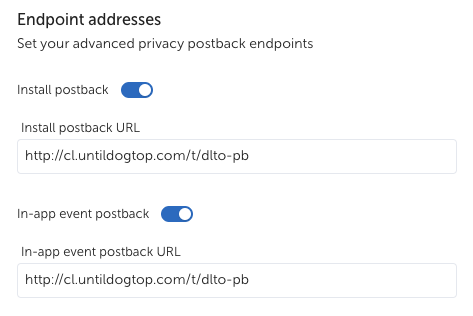
Postback Parameters setup
Since DLTO will directly pass publisher's parameters to advertisers, it is necessary to confirm the parameters on both sides before settings up the postback.
Refer to: Appsflyer Postback Macros Guide
Likely, there is a mandatory parameter that we need to put on our postback URL to trigger the conversions attribution. Campaign Token it is. What you need to do would be:
- select an empty macro of Appsflyer (i.e. Site ID/Campaign ID) for
#CampaignToken#a parameter name on campaign DLTO setup - append the name to a dynamic receiving parameter on Appsflyer's postback URL
You will be asked to enter the receiving parameter of Site ID or Campaign ID to get the mandatory tracking element of the conversions. id would be the corresponding parameter to receive the Campaign Token. Please kindly confirm on the attribution link that you are adding af_site_id/af_c_id to the tracking url if site ID/campaign ID (the id on postback setup on Appsflyer) were set on the postback.
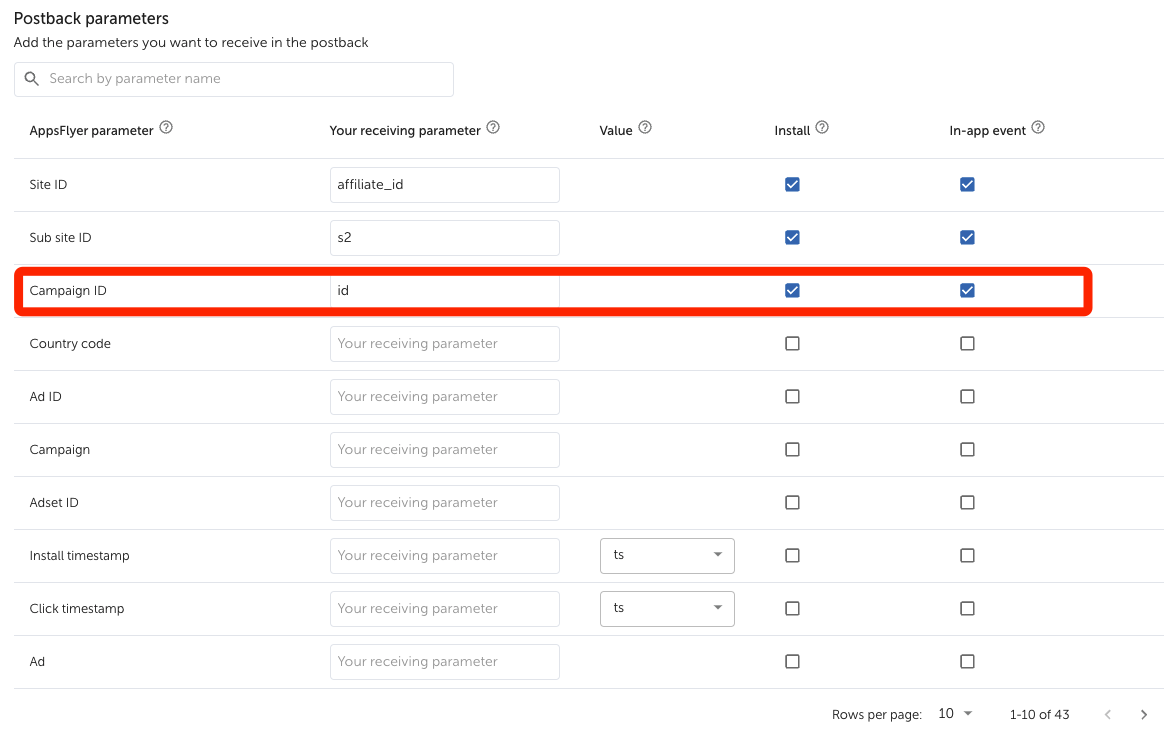
Also, you might be asked to enter parameters to receive user agent, IP and user language as Appsflyer suggests/requires. See below for parameters guide:
Appsflyer parameter
TR receiving parameter (on postback setup)
Appsflyer value/Macro on attribution url
User Agent
user-ua
{af_ua}
User IP
user-ip
{af_ip}
User Language
Empty S token (s6)
{af_lang}
Event
YD event ID/API name that matches the advertiser's event
{event_id}/{event}
Considering to keep sending conversions through affiliate's global postback URL, it is suggested to take one of the Appsflyer's Postback Parameters to record publisher's click ID and get it received on one of our S tokens.
For example, if your publisher's postback set as https://api.postback.com/clk/convid=#s1#on YD, then you shall add S1 on Appsflyer's receiving parameters.
Example Postback link after set up on Appsflyer
http://pb.trackrevenue.com/t/dlto-pb?id={Campaign ID}&user-ip={af_ip}&user-ua={af_ua}&s6={af_lang}Step 2. Get offer url set up on Appsflyer
Referring to Appsflyer's Help Center, you will see the requirements of setting Click URL. Following the guide and append the mandatory parameters on the click URL.
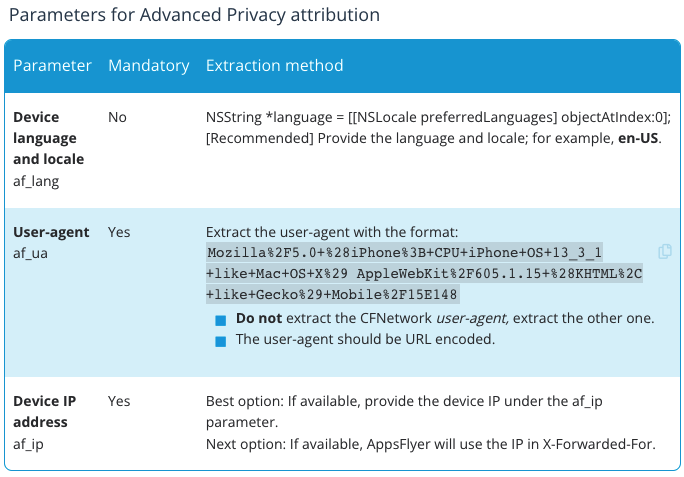
Attribution Link
When you generate Appsflyer's attribution link, please kindly have all the DLTO related parameters set up so that we can receive all the required parameters.
Please refer to the Help page of YD to check out the Offer parameters/tokens.
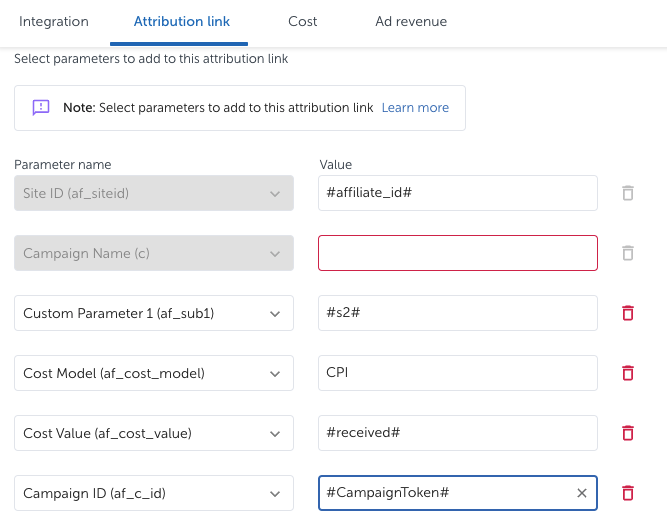
Offer link Example
https://app.appsflyer.com/id123456789?pid=YOUR_NETWORK_ID&c={CampaignName}&af_c_id={CampaignID}&af_adset={adset name}&af_adset_id={adset ID}&af_ad={ad name}&af_ad_id={ad ID}&af_ad_type={Ad-type}&af_siteid={PublisherId}&af_ua={USER-AGENT}&af_lang={LANGUAGE}&af_ip={IP}Step 3. Enable DLTO on YD
After having the click URL of Appsflyer, please get back to YD and set up the respective parameters.

DLTO Base URL: please put the static part of the click URL from Appsflyer.
ie: https://app.appsflyer.com/id123456789?pid=YOUR_NETWORK_ID
Campaign ID Param Name: this is param that we are sending our campaign attribution identifier to the advertiser. It depends on how you set up the campaign ID parameter on the postback URL on Appsflyer postback management.
For example, if you put 'id={Campaign ID}' on the postback, then you should enter af_c_id here.
Reference Parameters Example:
postback: site ID/campaign ID ➝ id
offer: campaign token param name = af_site_id /af_c_id=#campaigntoken#
campaign: af_sub={pub_sub_id}&af_ua={user_agent}&af_ip={user_ip}
Links Comparison
DLTO postback setup on Appsflyer (Check macro guide on Appsflyer for correct macros to use)
http://cl.untildogtop.com/t/dlto-pb?id={af_c_id}&client_ip={af_ip}&client_user_agent={af_ua}&s2={clickid}&s1={af_sub1}&s3={idfa}YD postback url on AF: https://cl.untildogtop.com/t/dlto-pb?id={Campaign ID}&s1={ad_set}&s2={ad_site}&user-ip={af_IP}&user-ua={useragent}
AF offer link: https://app.appsflyer.com/id123456?pid=cc_int&ad_set=#s1#&af_c_id=#CampaignToken#&ad_site=#s2#&af_ip=[[ip]]&af_ua=[[ua]]&af_lang=EN
YD DLTO campaign link to pub: https://app.appsflyer.com/id123456?pid=cc_int&ad_set=[[clickid]]&ad_site=[[pub_id]]&af_ip=[[ip]]
pub postback url: https://track.pubpostback.com/end?affsub=#s1#
Usual global postback url:
https://cl.untildogtop.com/t/pb?leadid={Click ID}Usual Click url:
https://app.appsflyer.com/com.zhiliaoapp.musically?pid=creativeclicks_int&af_siteid=#affiliate_id#&af_sub1=#s2#&af_cost_model=CPI&af_cost_value=#received#&af_cost_currency=USD&af_click_lookback=7d&idfa=#s5#&advertising_id=#s4#&clickid=#subid#DLTO link url on offer page:
https://app.appsflyer.com/com.zhiliaoapp.musically?id=#CampaignToken#&pid=creativeclicks_int&af_cost_model=CPI&aff_siteid={affiliate_id}&af_sub1={sub_id}&af_cost_model={CPI}&af_click_lookback={7d}&idfa={idfa}&advertising_id={advertising_id}&clickid={subid}DLTO link on campaign page:
https://app.appsflyer.com/com.zhiliaoapp.musically?id=M7Iq0hKRsmmul&pid=creativeclicks_int&af_cost_model=CPI&aff_siteid=[[publisher]]&af_sub1=[[s2]]&af_cost_model=CPI&af_click_lookback=7d&idfa=[[idfa]]&advertising_id=[[advertising_id]]&clickid=[[click_id]]🏆 Brand Ranking & Advertiser Portal
📍 Brand Ranking · Advertiser PortalBrand Ranking displays comparative advertiser performance with configurable widgets. Trend Analysis shows historical ranking movement. User-identifying data is no longer passed in API request parameters.